Device Filters
Device filters enable users to easily, effectively, and accurately choose the target devices for Command Center jobs. These are the target devices that will receive Over-the-Air (OTA) updates for the full host application or a specific component application. With filters, users can either provide a specific list of Device Serial Numbers (DSNs) to target, or dynamically choose the devices using a query.
This section of the Command Center features guide describes everything you need to know about device filters, including how to create, manage, and modify them.
The Device Filters Tab
This is where you can create, manage, and modify device filters in the Command Center, as well as monitor and manage the target devices for the filters. Refer to the following example for the location of the Device Filters tab:
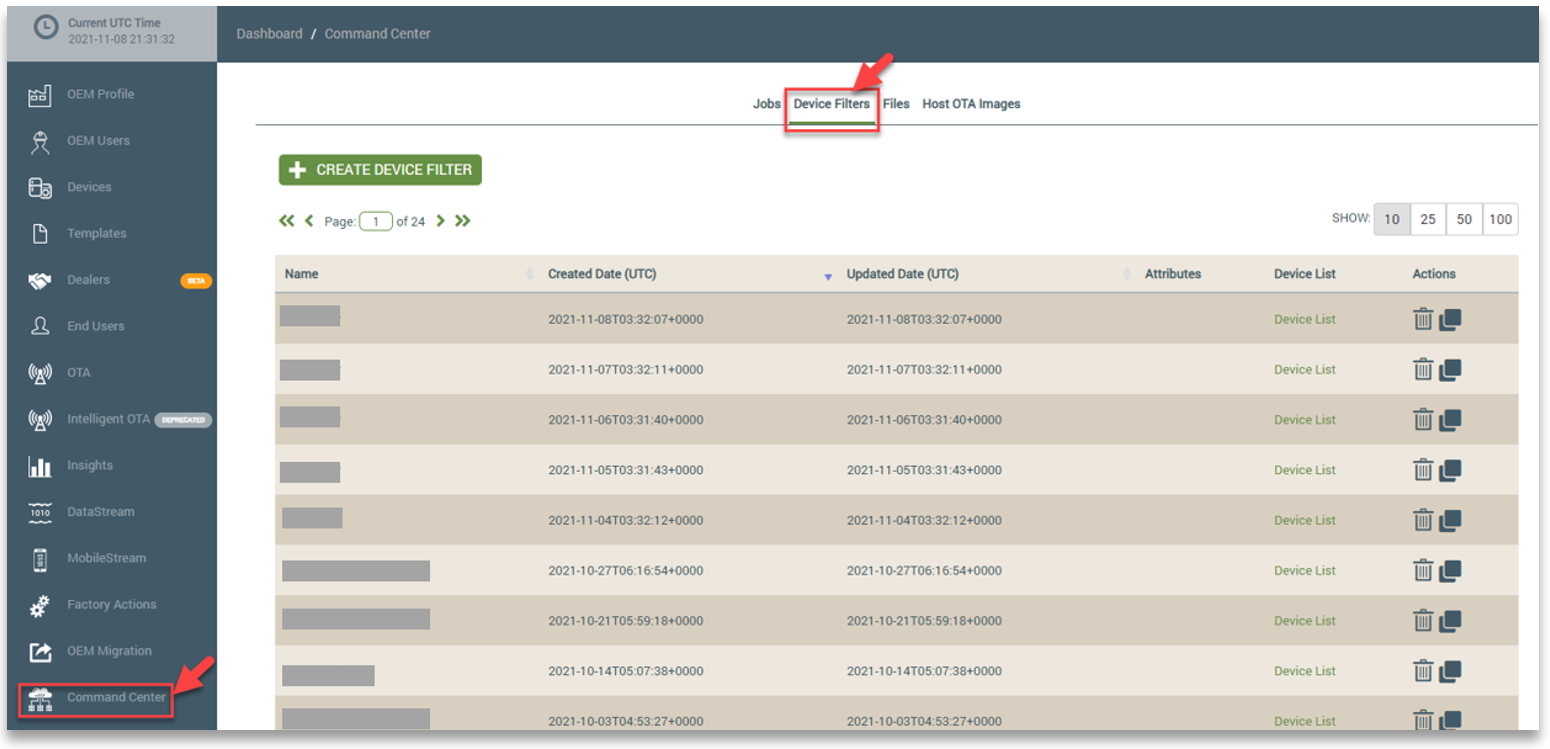
Refer to Creating Device Filters to configure filters using the Device Filters tab. (This includes cloning existing device filters.)
Managing Device Filters
Viewing/Deleting Existing Filters
Whether created using the Device Filters tab or while configuring your job in the Command Center, all device filters are listed on the Device Filters tab. You can click the Name, OEM Model, Created Date (UTC), or Updated Date (UTC) columns to change the order of the list depending on how you prefer to view the available filters. In the following example, the device filters list is sorted by the Name column:

On the Device Filters tab, you can delete device filters from the Ayla Platform (also shown in the example above).
Viewing Devices for a Filter
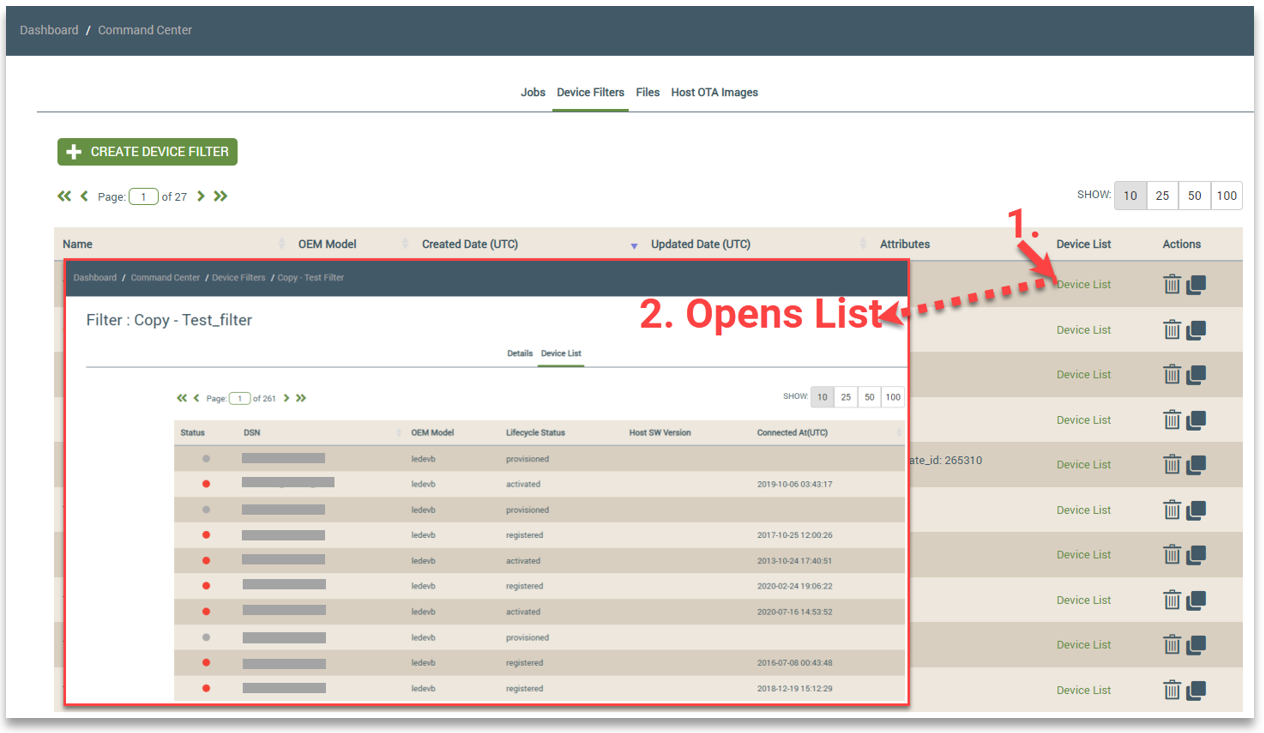
From the Device Filter tab, you can view the target device list for any filter (as shown in the following example):
- On the Device Filters tab, click the Device List link for the filter.
- On the Device List tab that opens, use the navigational tools to view the complete list of devices for the selected device filter.
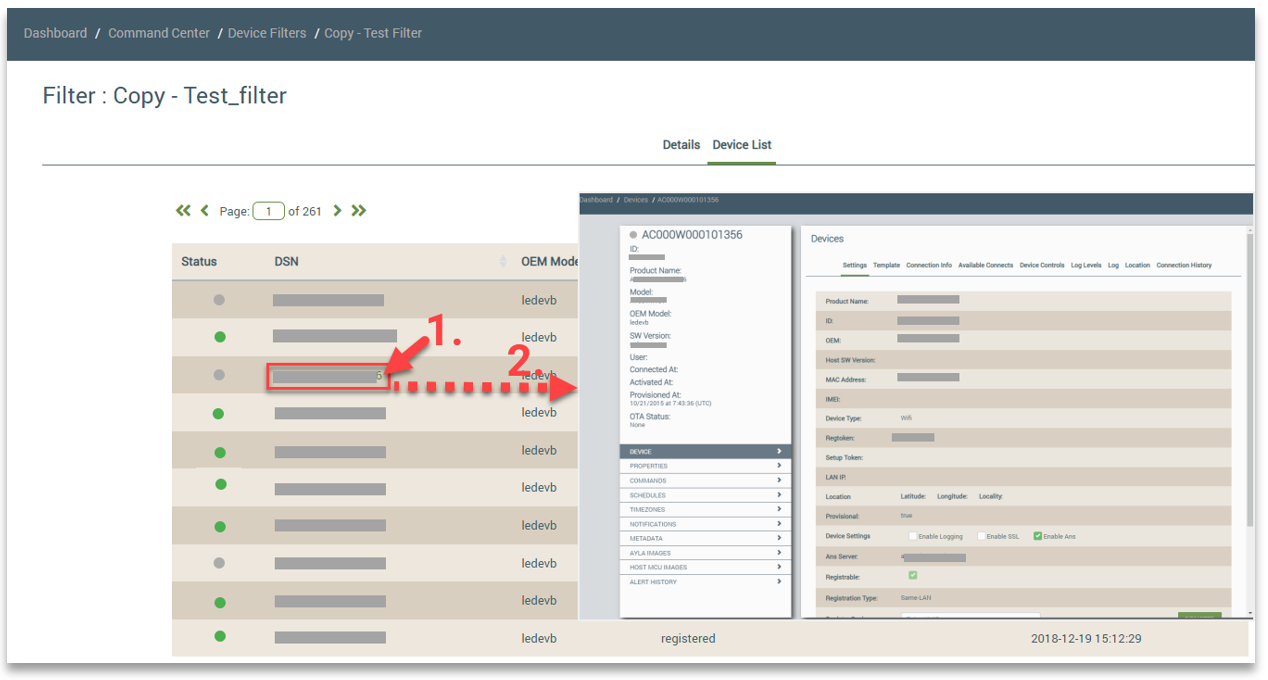
You can also view configurations and other information for any of the devices on the Device List tab (as shown in the example below):
- Click the Device Serial Number (DSN) on the Device List tab.
- On the Device page that opens, navigate the information you wish to view.
Changing Filter Configurations
You can use the Device Filters tab to change the settings for a filter, as well as view, change, or add configurations for the devices targeted by the filter. On the Device Filters tab, click the filter you wish to modify, as shown in the following example:

To activate the editing mode, click the EDIT button, and then read and accept the Confirmation message. Refer to the following example:
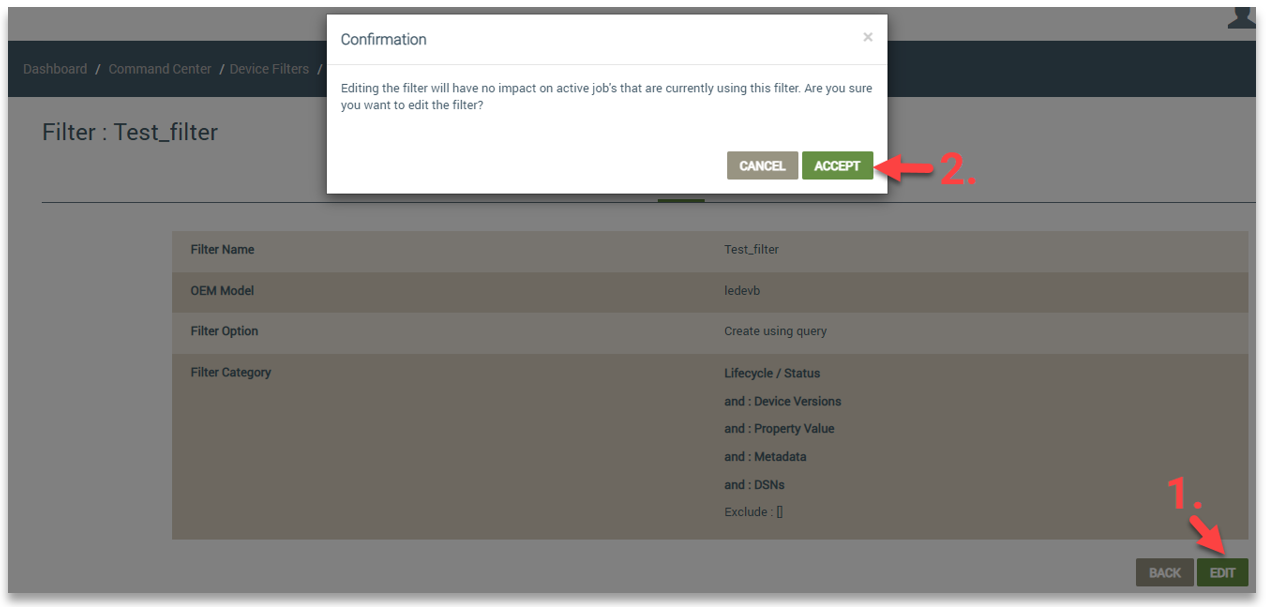
Notice the configurations that you can change in editing mode, including adding metadata and selecting a new filter option and filter category. These configurations are described in Creating Device Filters. For a description of a particular setting, hover your cursor over the question mark icon to display the tool tip. After making your changes, click the UPDATE button. Refer to the following example:
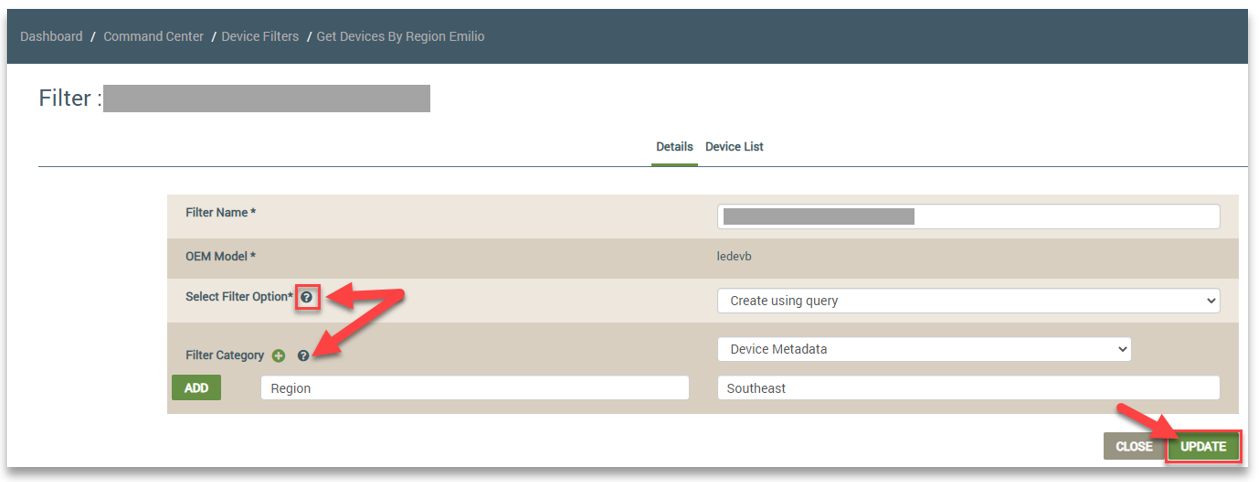
To view, change, or add configurations for a target device, click the Device List tab, and then click the DSN (Device Serial Number) for the target device in the list. Refer to the following example:

When you click the DSN link, the Devices area of the Ayla Customer Dashboard opens for the selected target device, which provides all of its information and current settings. This area is where you configure almost all device settings.
Creating Device Filters
There are three ways to create a device filter:
- Using the CREATE DEVICE FILTER button on the Device Filter tab
- Cloning an existing device filter from the Device Filter tab
- While creating a Command Center job
Using the CREATE DEVICE FILTER Button
Following shows where you create device filters using the CREATE DEVICE FILTER button on the Device Filter tab:
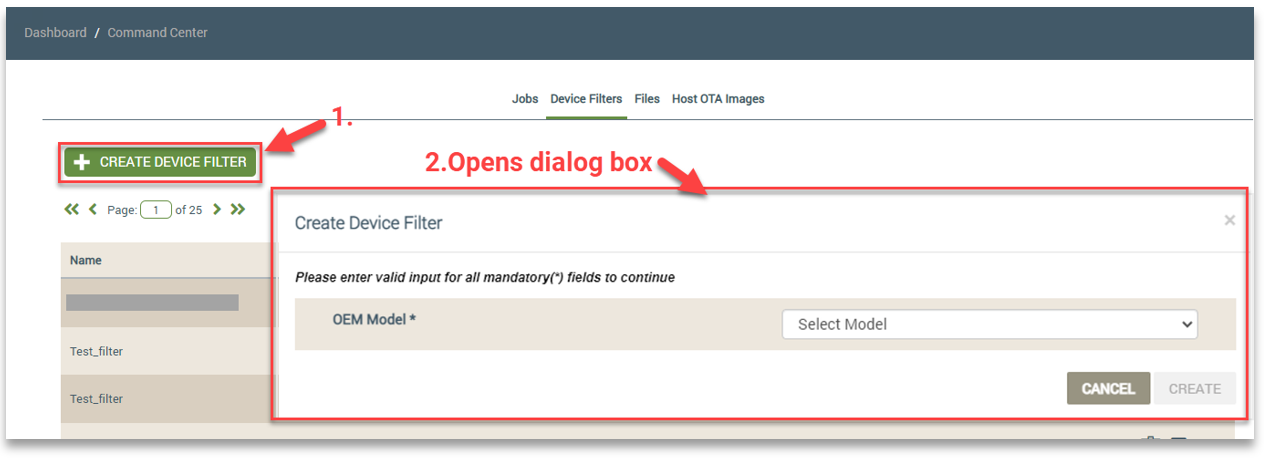
Notice in the above example that you need to select the OEM Model to display all of the fields on the Create Device Filter dialog box, as shown in the example below. You must also do this when creating a filter while configuring a Command Center job.
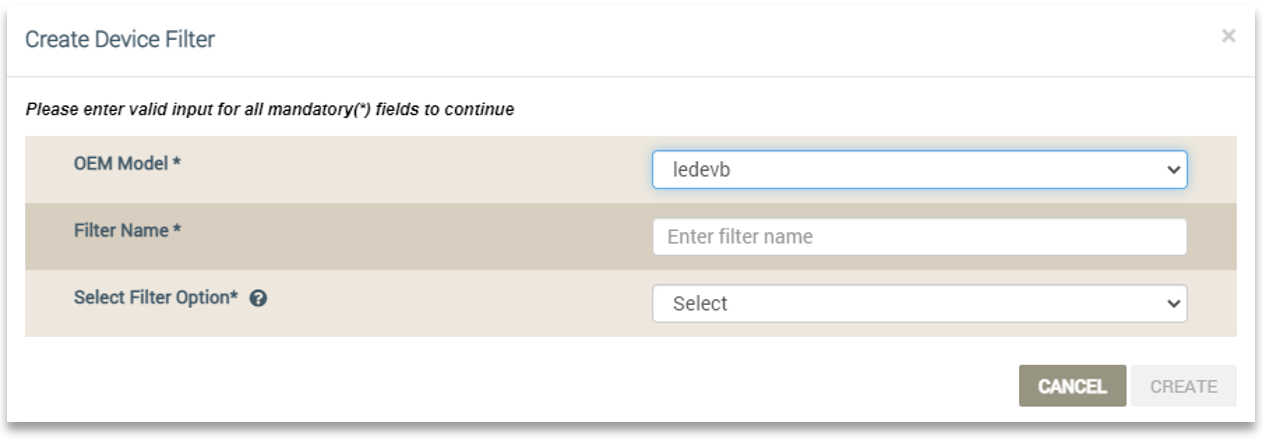
Cloning an Existing Device Filter
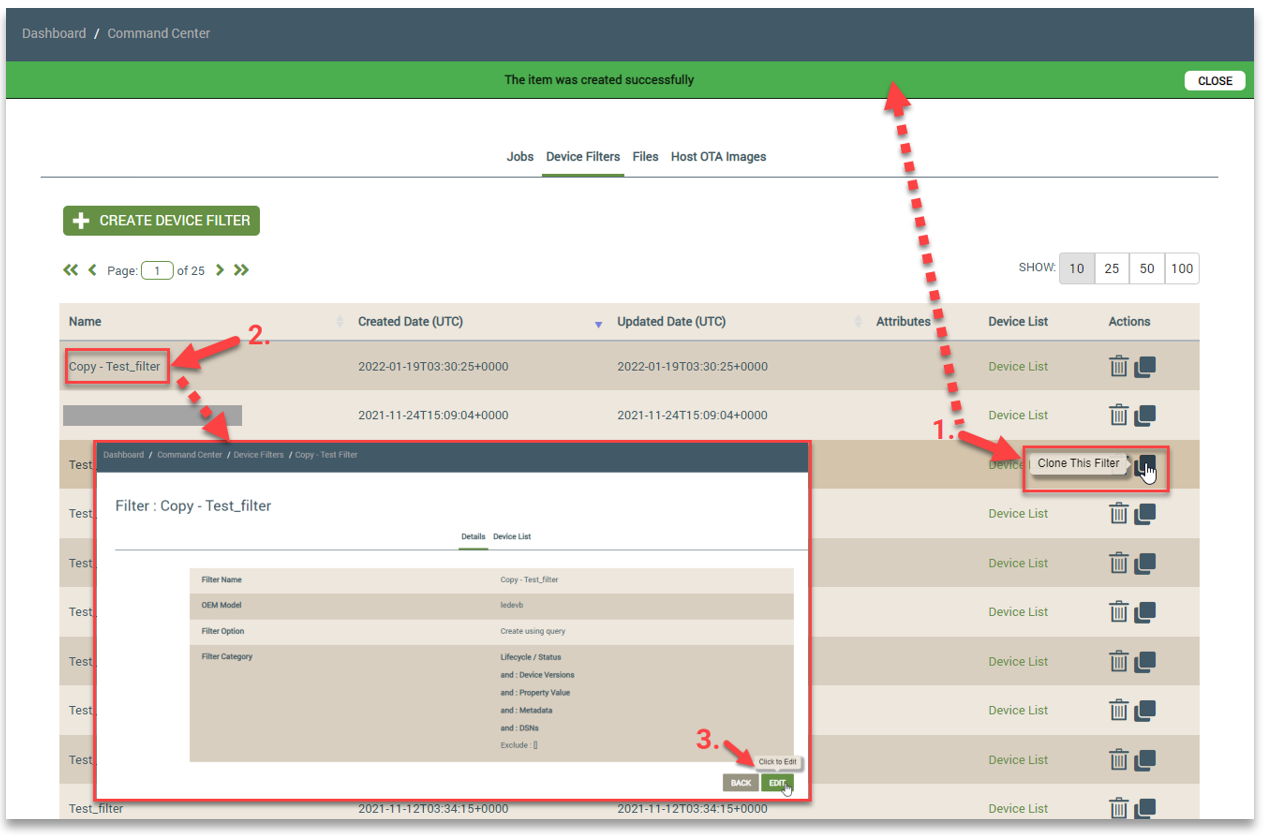
Following shows an example of cloning an existing device filter to create a new filter from the Device Filters tab. Notice that it is three simple steps:
- Click the Clone icon on the Device Filter tab. When the cloned filter is added to the filter list, a success message displays across the top of the page (as shown in the example).
- Click the cloned filter, which is listed as a "copy" (as shown in the example). This opens the edit view for the cloned filter (also shown in the example below).
- Click the EDIT button on the Details tab for the cloned filter to rename it and modify the settings, creating a new filter that is added to the Device Filters tab.
While Creating a Command Center Job
Following is an example of creating a new filter when creating a Host OTA job, which is the same step-by-step process for all Command Center job types. As shown, you can create a filter in Step 3. Notice that you also have the options not to create a filter for the job or to select an existing filter. If you create a new filter, it is included in the filter list on the Device Filters tab.
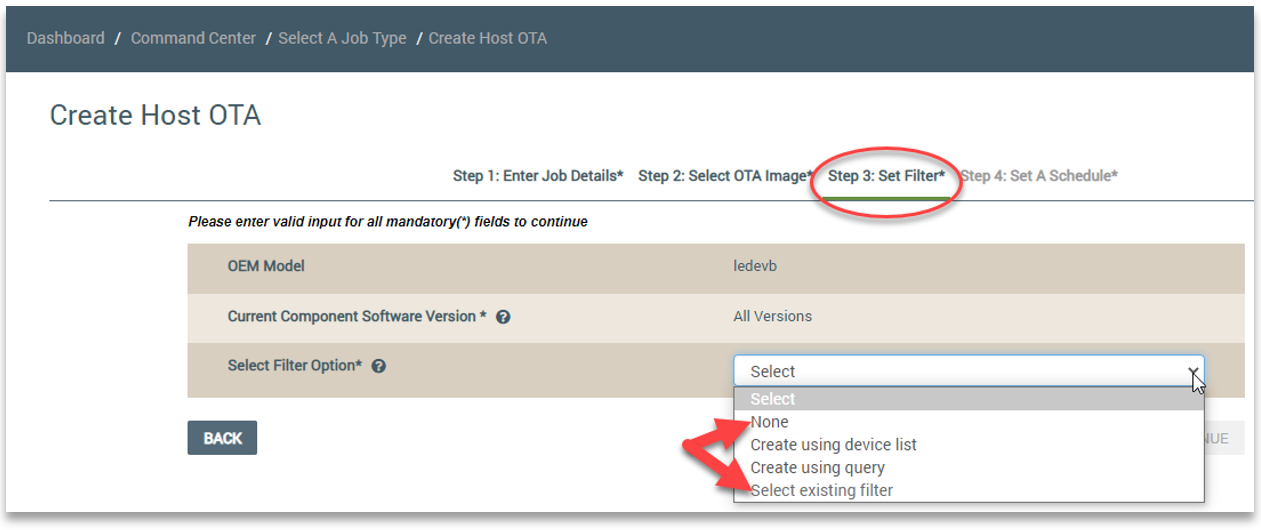
Filter Options
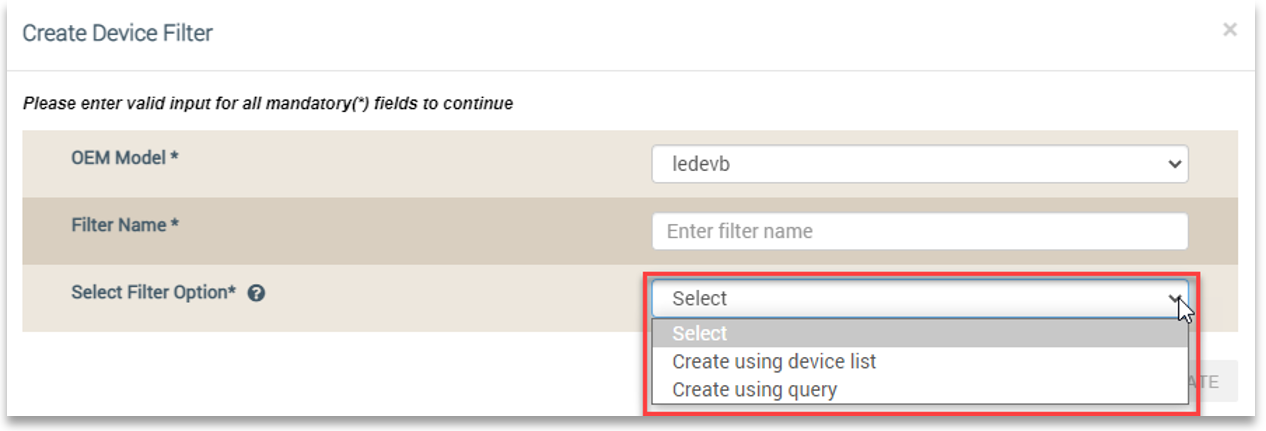
The filter options are the same whether you create a device filter from the Device Filter tab or while creating a Command Center job. These options are as follows (also shown in the example below):
- Create using device list
- Create using query
The Create Using Device List Option
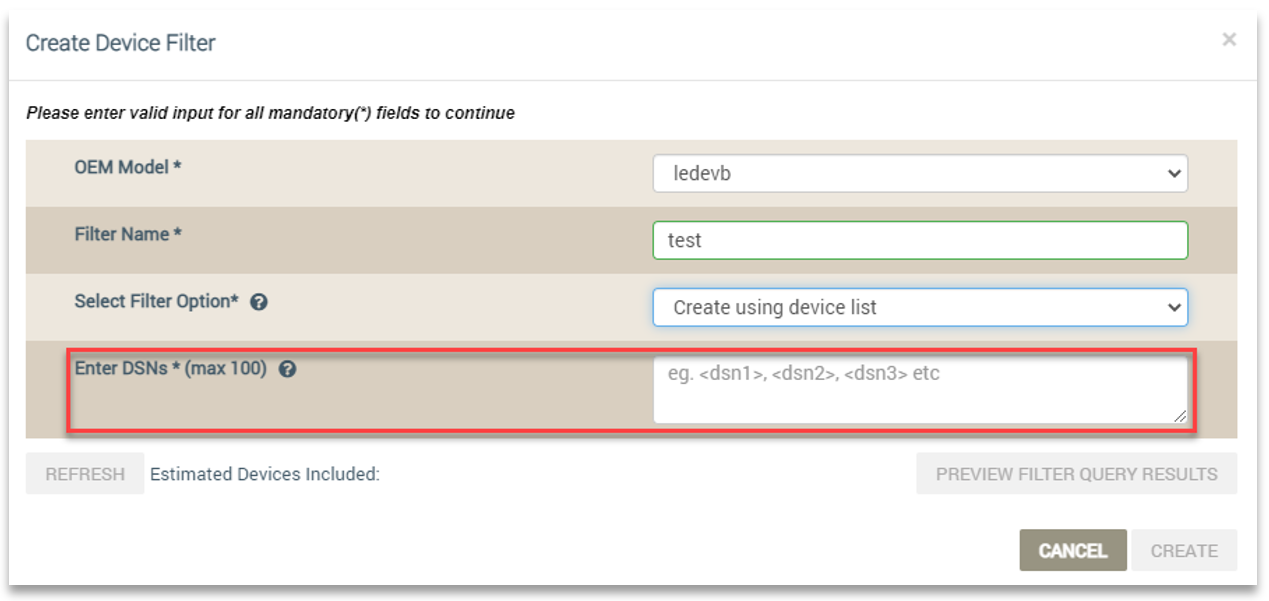
This option enables you to specify a static list of devices to target. When you select this option in the Select Filter Option field, another field displays in which you enter the DSNs (Device Serial Numbers) of the devices to target. Refer to the following example:
The Create Using Query Option
This filter option enables you to specify criteria that will dynamically create a list of devices to target. You can specify criteria across the device lifecycle/connectivity status, versions, property values, and metadata. These are the four categories along with a setting to enter the DSNs (Device Serial Numbers) of specific devices that you wish to exclude from the filter query. Refer to the following example:
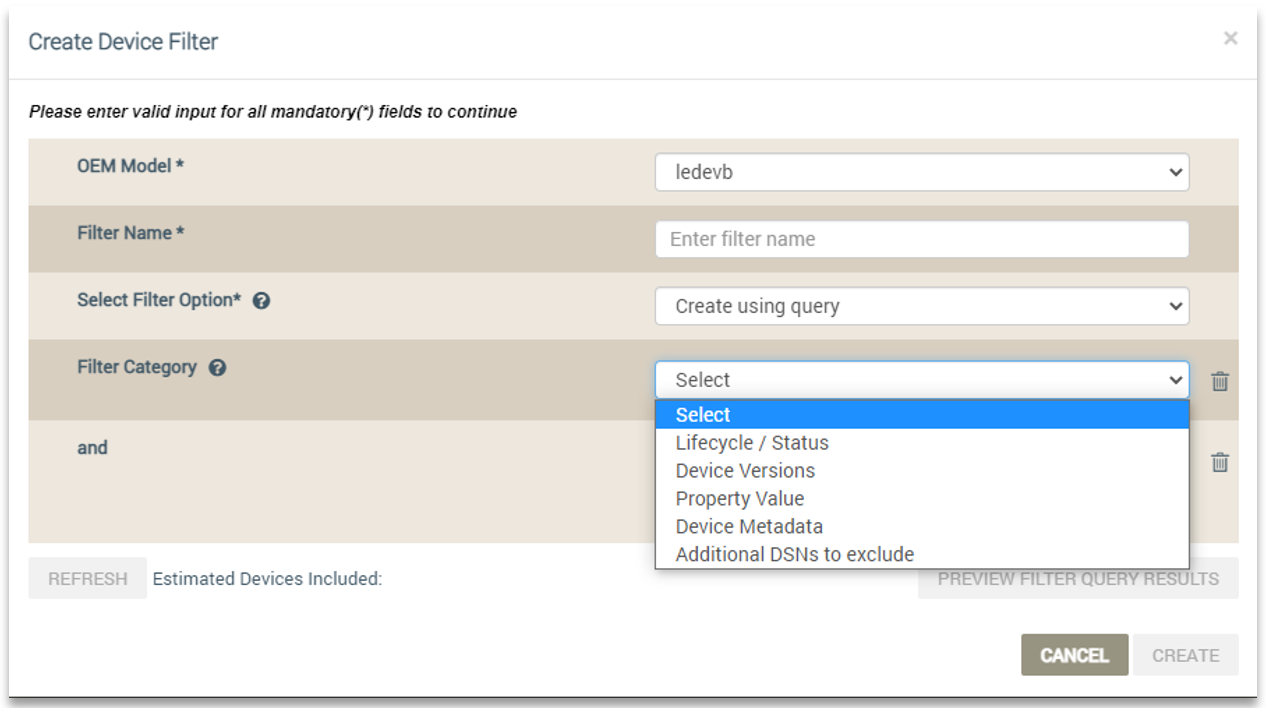
The categories are described in the next section.
Filter Categories for the Query Option
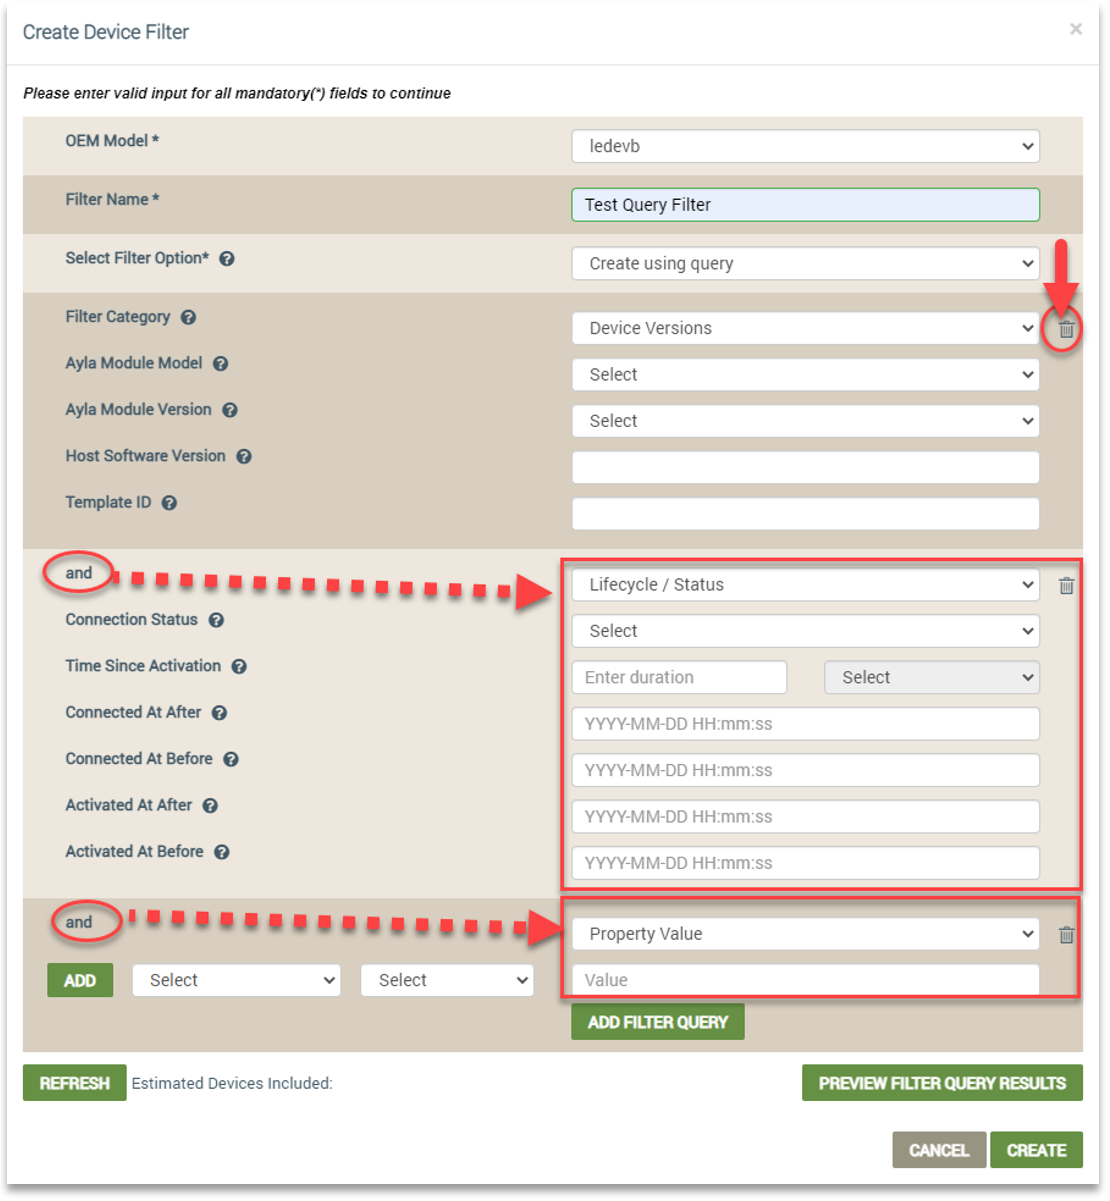
As stated, using a query filter enables you to define a target group of devices based on specific criteria for the device lifecycle/status, versions, property values, and metadata (which are the filter categories). You can create a filter that uses more than one or all filter categories by clicking the ADD FILTER QUERY button, as shown in the following example:

Following shows a query filter using three different categories. Notice also that you can delete a filter category by clicking the trash can icon.
Device Lifecycle/Status
This filter category targets devices based on their lifecycle events and connectivity status. Upon selecting Lifecycle/Status, the fields shown in the following example display. Hover your cursor over the question mark icon to show a tool tip with the complete description of what to enter in each field (also shown in the example below).
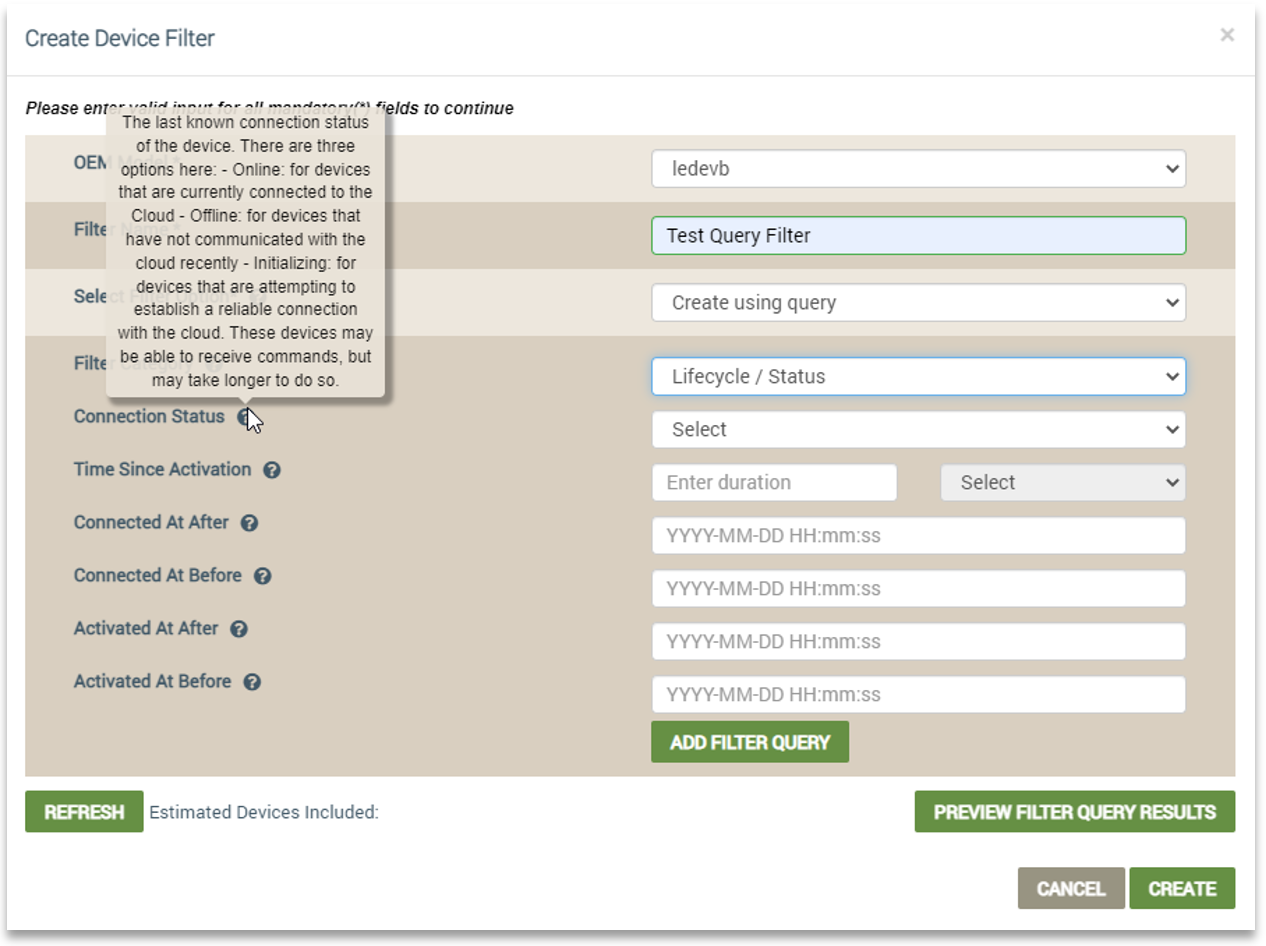
Following are descriptions of the fields:
- Connection Status:
Initializing- this is for devices that are attempting to establish a reliable connection with the Ayla Cloud. These devices may be able to receive commands, but may take longer to accomplish this.
Offline - this is for devices that have not communicated with the Ayla Cloud recently.
Online - this is for devices that are currently connected to the Ayla Cloud. - Time Since Activation: this is the amount of time that should pass after activating the target devices and before running the job. The time can be in days, months, etc. (e.g. 2D or 3M). This is useful if you want to avoid running jobs for end users that have just activated their devices to ensure a good initial user experience.
- Connected At After: this is the date of the last time the target devices connected to the Ayla Cloud. The job will only apply to devices that connected after the date entered in this field.
- Connected At Before: this is the date of the last time the target devices connected to the Ayla Cloud. The job will only apply to devices that connected before the date entered in this field.
- Activated At After: this is the date of the first time the target devices were activated. The job will only apply to devices that were activated after the date entered in this field.
- Activated At Before: this is the date of the first time the target devices were activated. The job will only apply to devices that were activated before the date entered in this field.
Device Versions
This filter category targets devices based on their hardware and software versions, including OEM model, templates, and firmware. Upon selecting Device Versions, the fields shown in the example below display. Hover your cursor over the question mark icon to show a tool tip with the complete description of what to enter in each field (also shown in the example below).
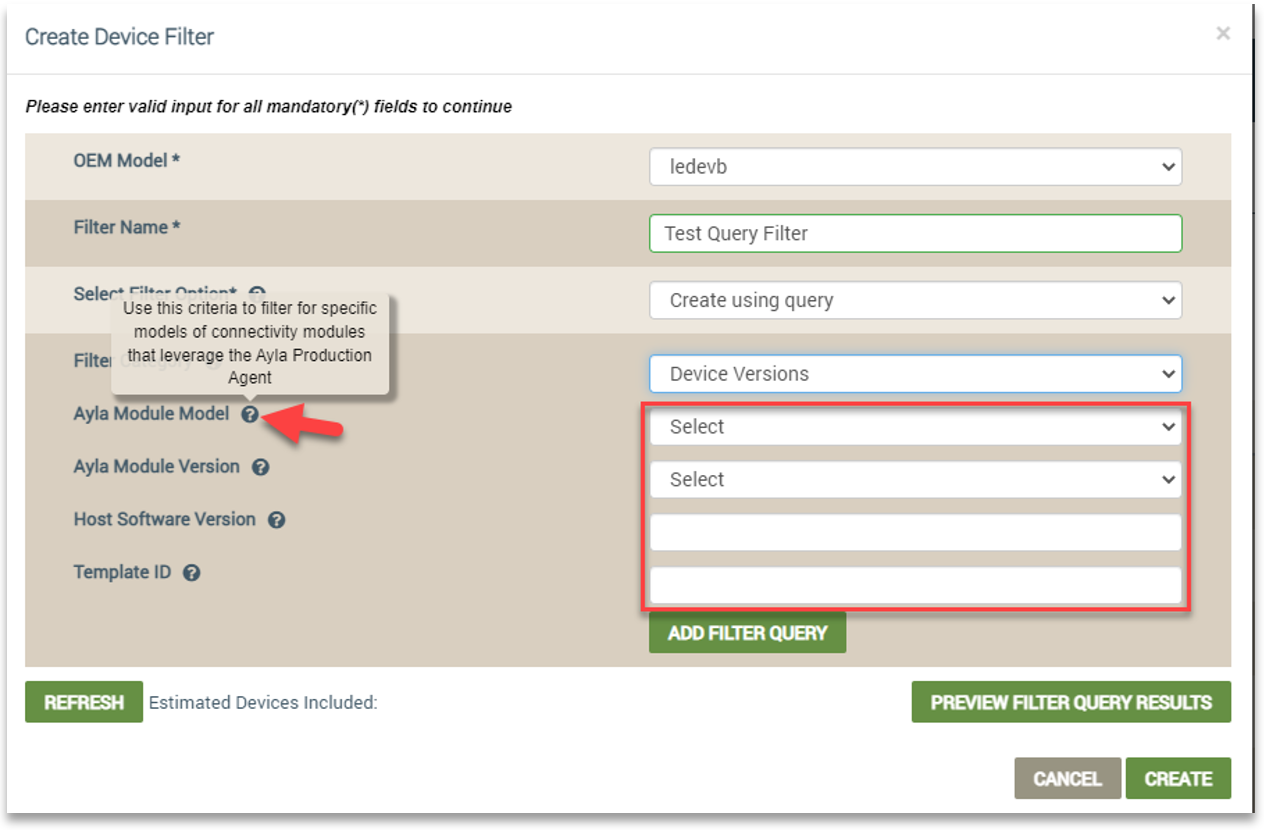
Following are descriptions of the fields:
- Ayla Module Model - this is the specific model name of the connectivity module that leverages the Ayla Production Agent. This is therefore only applicable for devices that use this agent. For more information on the Ayla Production Agent, click here.
- Ayla Module Version - this is the specific firmware version for the Ayla Production Agent on the target devices. This is therefore only applicable for devices that use this agent.
- Host Software Version - this is the current software version of the host firmware from which you wish to upgrade the target devices.
- Template ID - this is the template ID of the Ayla template that is associated with the target devices. Click here for more information on Ayla Templates.
Property Value
This filter category targets devices based on specific conditions for their device properties. Upon selecting Property Value, the fields shown in the example below display.
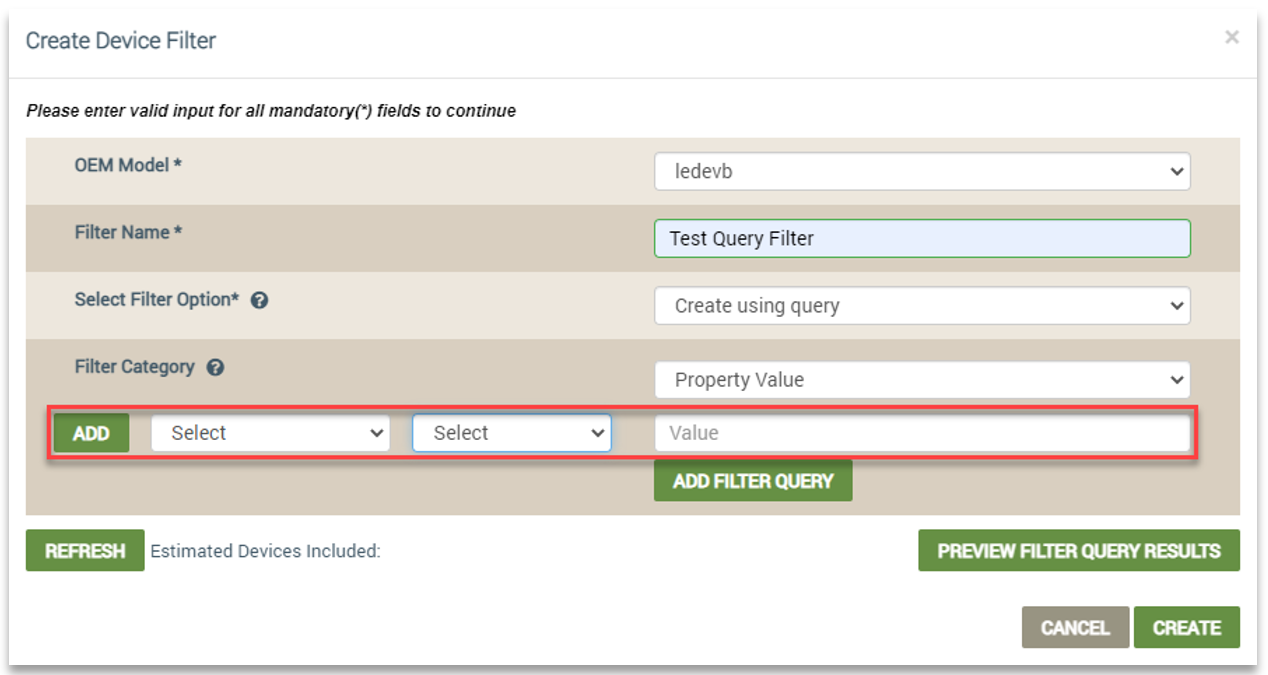
Following is a description of the settings for the Property Value category:
- The first drop-down list next to the ADD button is where you select the name of the property that you wish to target on the devices.
- The second drop-down list next to the ADD button is where you specify the operator for the property value of the property that you wish to target on the devices.
- The Value field is where you enter a value for the property that you wish to target on the devices.
- The ADD button is to specify additional device properties for the target devices. You can add a maximum of 10 device properties.
Device Metadata
This filter category targets devices based on specific device metadata. You may choose this filter category, for example, to associate and categorize the job for your own internal needs, such as adding a campaign ID or an approval ID to the job for your internal tracking system. Upon selecting Property Value, the fields shown in the example below display.
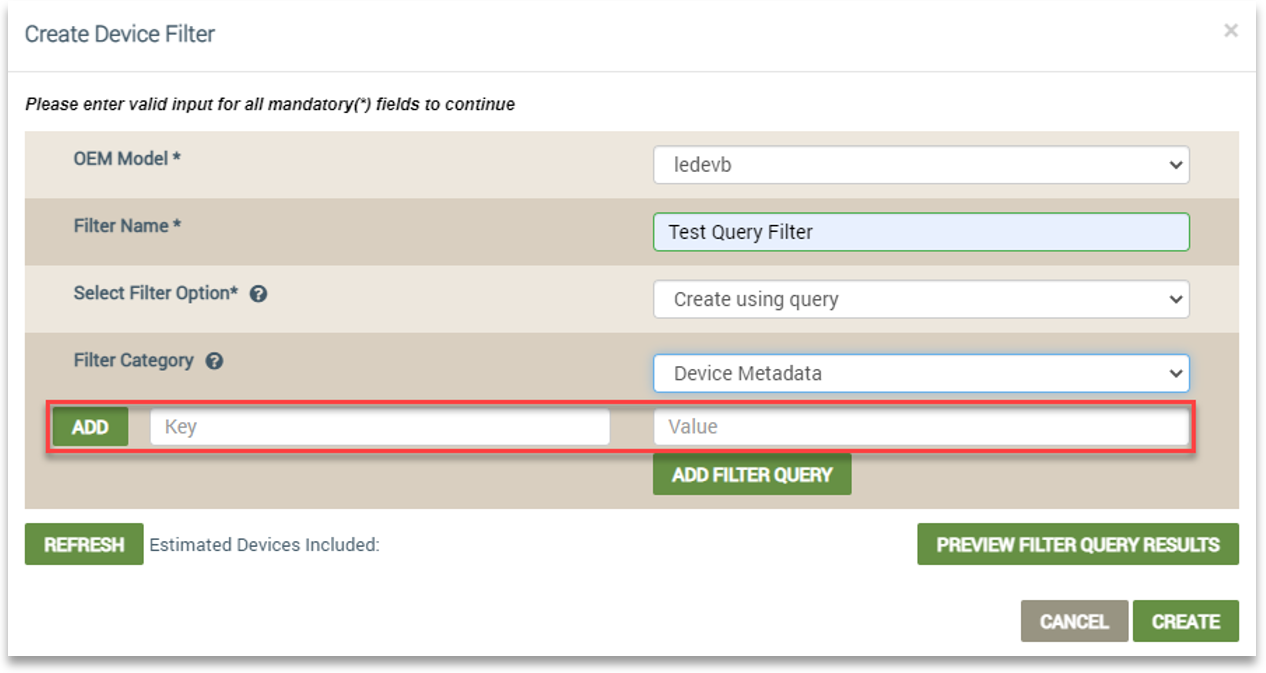
Following is a description of the settings for the Device Metadata category:
- Key - this is where you enter the key for the metadata; for example, it could be "Location" for smoke detector devices.
- Value - this is where you enter the value for the metadata's key; for example, it could be "Floor1" for a smoke detector device's location metadata.
Exclude Specific Devices
For any of the query filter categories, you can exclude specific devices that meet the criteria for the filter but you do not want to receive the OTA update for the job. Therefore, you use the Additional DSNs to exclude setting with another filter category. This is done by clicking the ADD FILTER QUERY button (as shown in the example below). The following example shows this setting used with the Device Versions category.
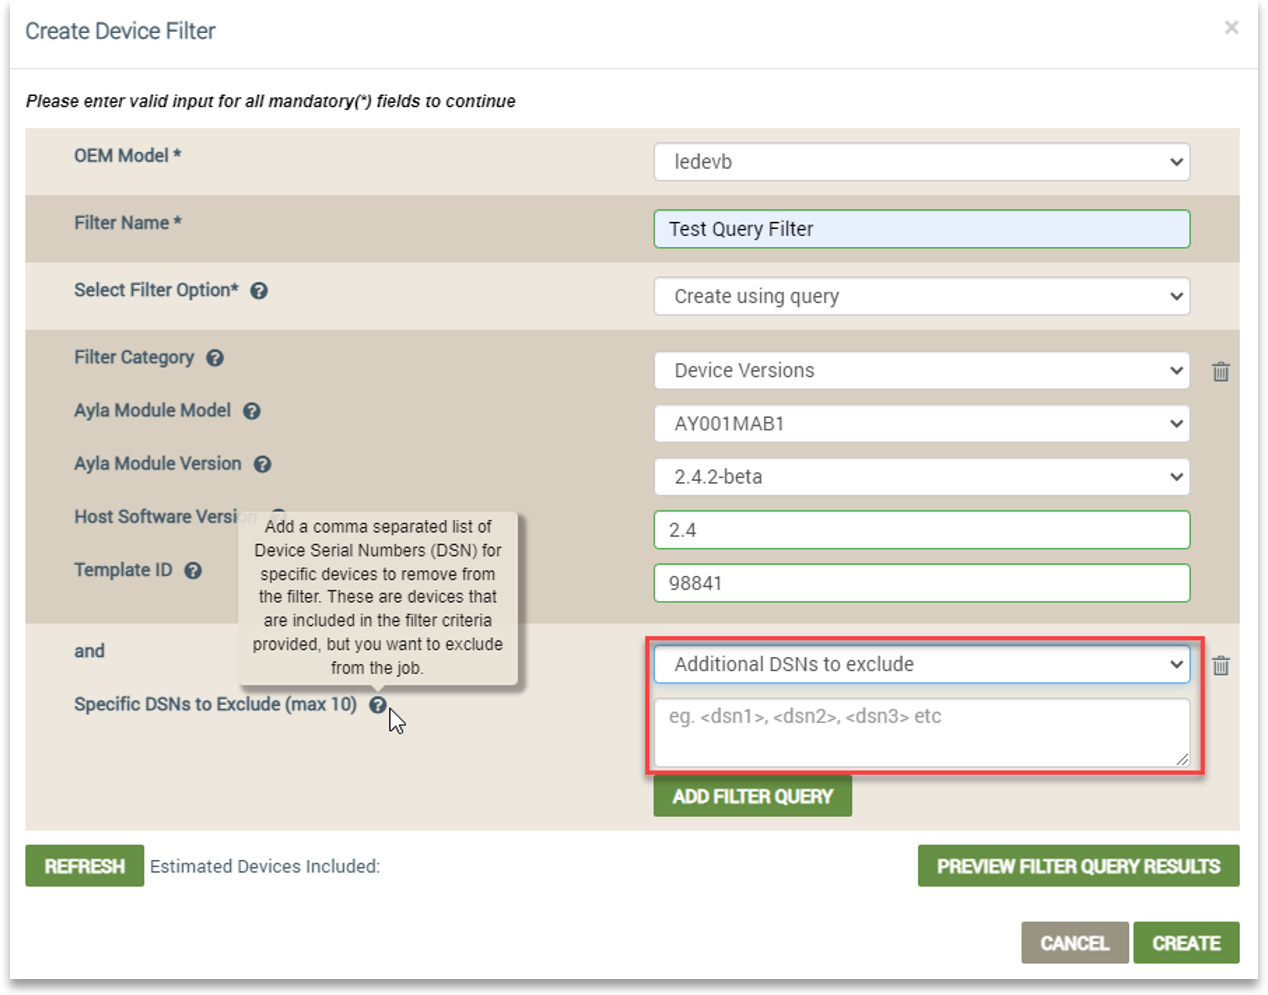
As stated in the tool tip (also shown in the above example), you can enter a maximum of 10 DSNs (Device Serial Numbers) for devices you wish to exclude from the filter.
Estimated Devices and Preview Filter Results
For both the Device List and Query filter options, you can obtain an estimated number of target devices, and preview potential filter results.
For an estimated number of target devices, click the REFRESH button after entering your settings for the filter option, as shown in the following example:
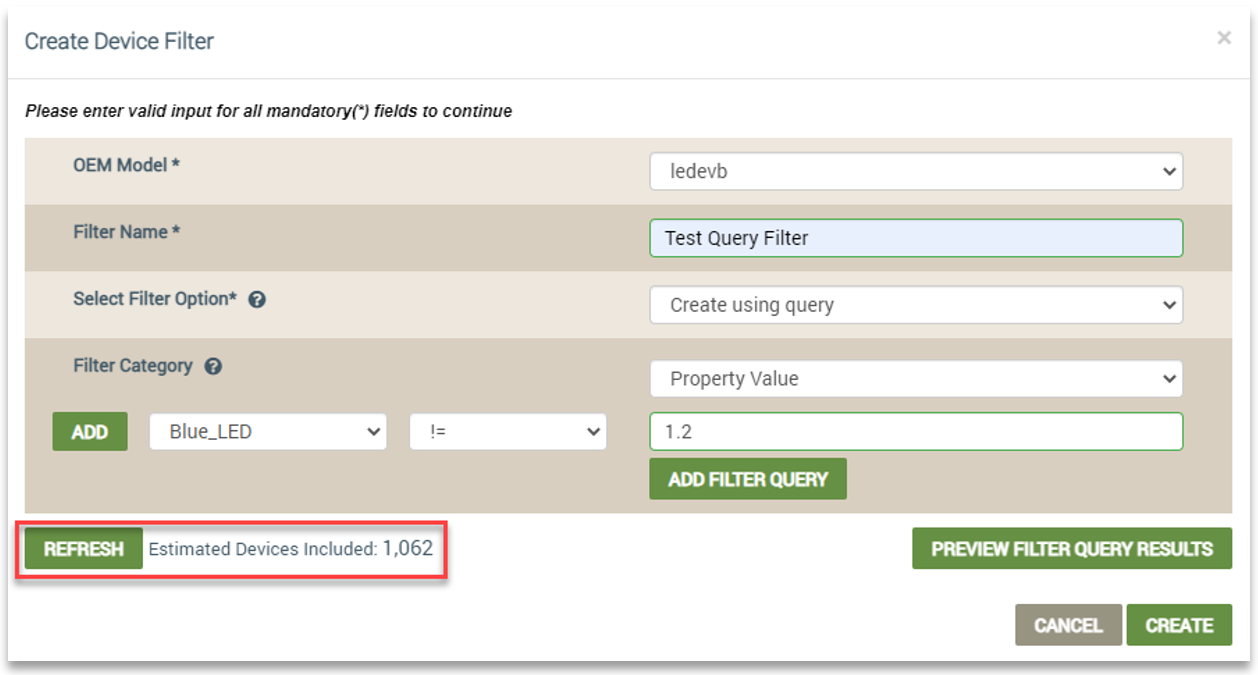
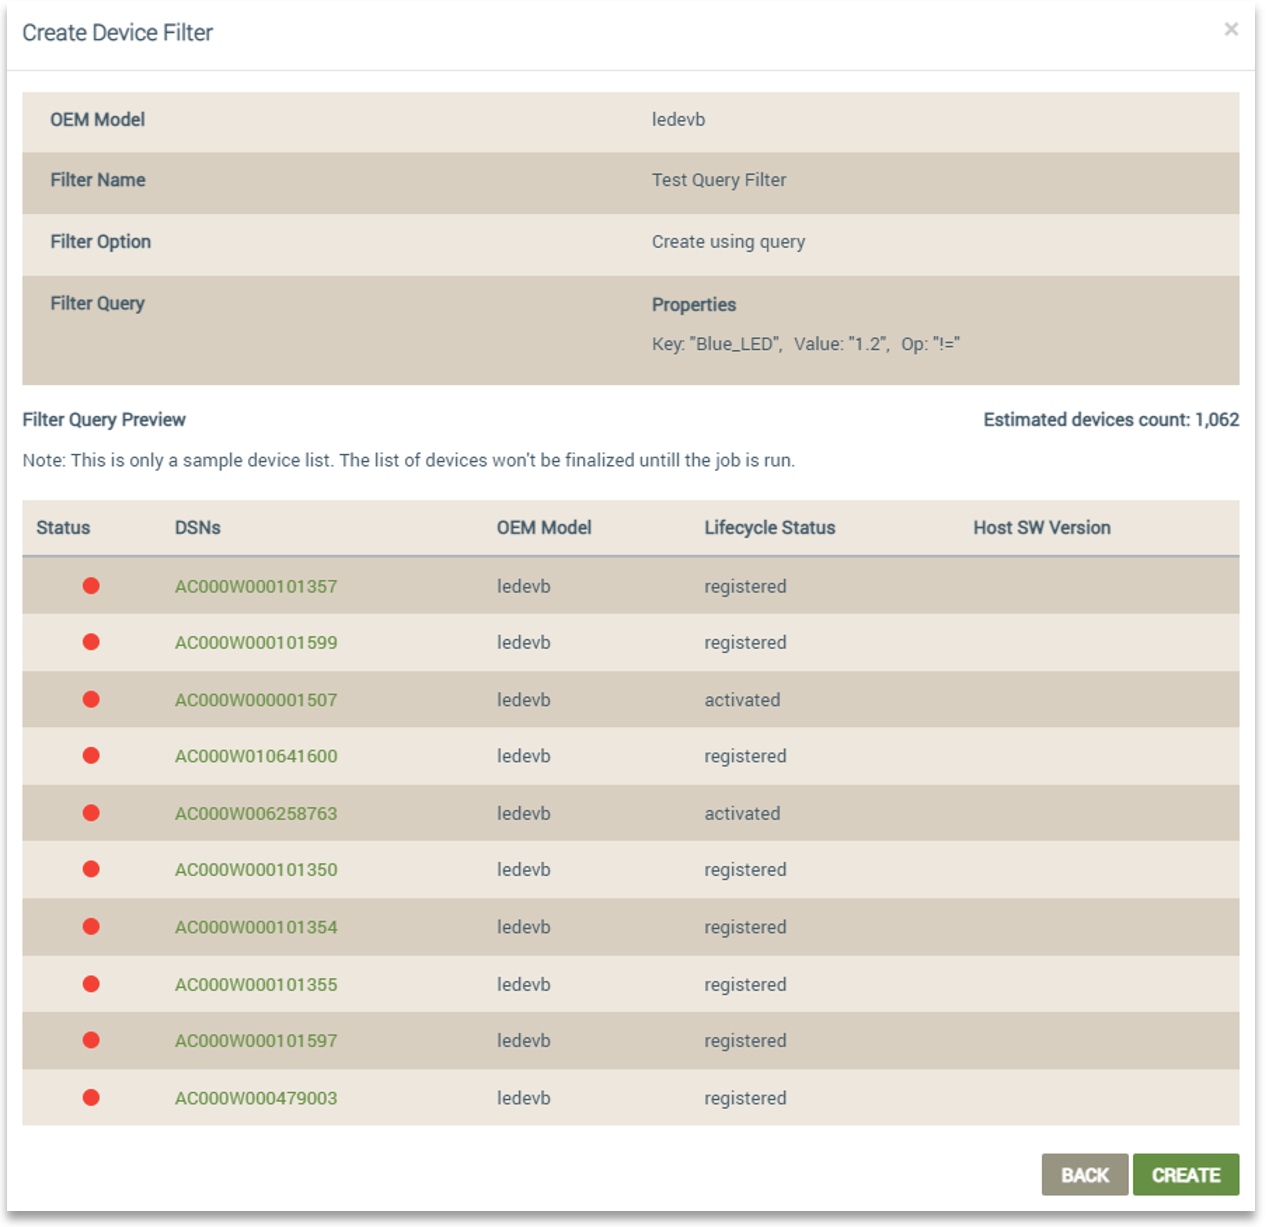
To preview your potential filter results, click the PREVIEW FILTER QUERY RESULTS button after entering your settings for the filter option. Refer to the following example of preview results:
Updated 8 months ago
