Linux Gateway Agent
This guide helps you experiment with the Ayla Linux Gateway Solution on a Raspberry Pi:
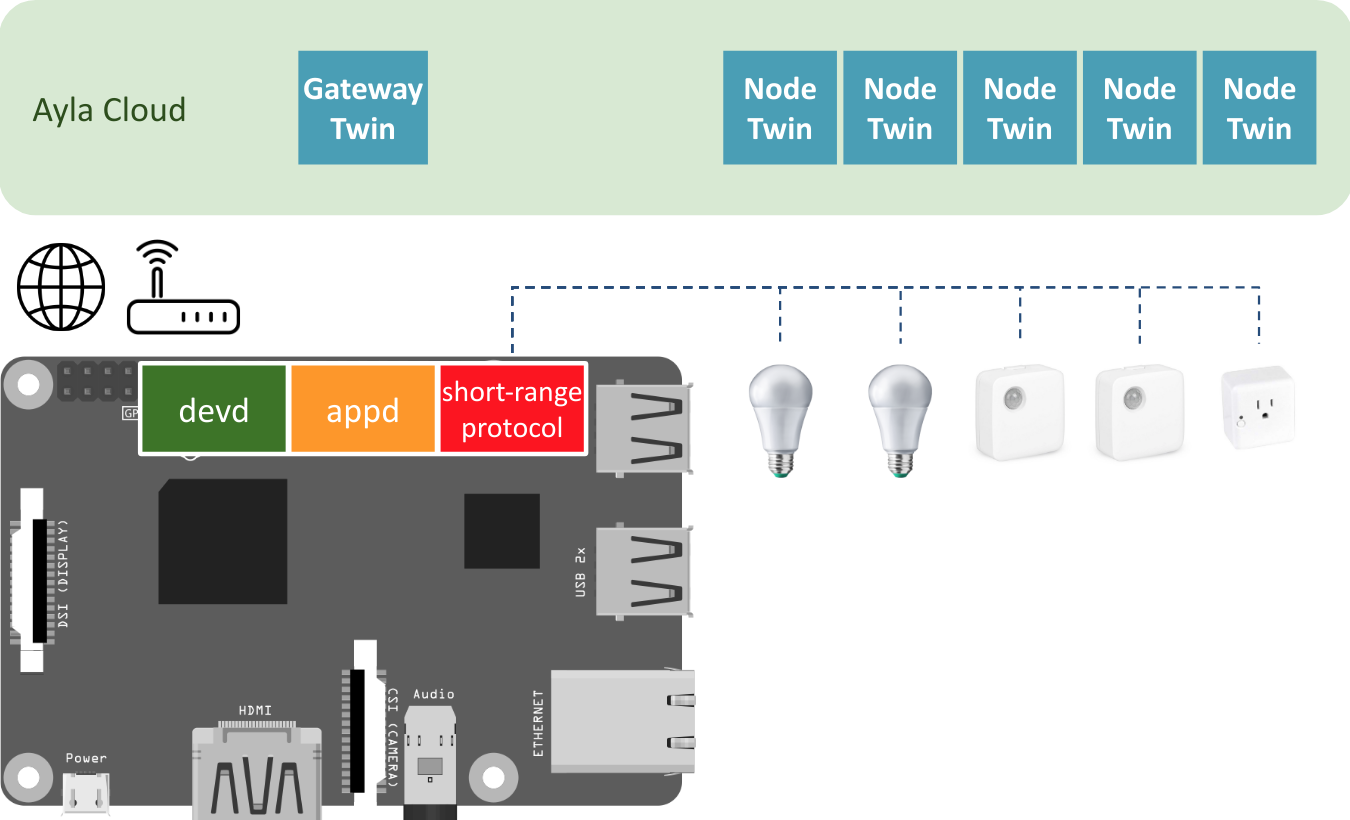
Note the following:
- The Ayla Agent is named
devdand the Ayla Example App is namedappd, both background processes. - The Raspberry Pi, agent, and app form the gateway which is represented by a digital twin in the cloud.
- The lightbulbs, sensors, and smart plug are nodes with short-distance capability.
- The nodes are also represented by digital twins in the cloud.
Ayla offers the following example gateways:
| Example Name | Github link | Description | |
|---|---|---|---|
| 1 | Simulator Gateway | gatewayd (To view this file, contact your Ayla Representative to set up an Ayla GitHub account) | Resembles the other gateway apps, but requires no hardware. |
| 2 | Bluetooth Gateway | bt_gatewayd (To view this file, contact your Ayla Representative to set up an Ayla GitHub account) | Manages Bluetooth devices. |
| 3 | Zigbee Gateway | zp_gatewayd (To view this file, contact your Ayla Representative to set up an Ayla GitHub account) | Manages Zigbee devices. |
You build and install one of these on your RPi at a time.
Generic setup
Set up a Raspberry pi
For help setting up your Raspberry Pi, see Set up a Raspberry Pi in Ayla Linux Device Solution.
Clone the Ayla repository
- Secure shell to your RPi:
$ ssh [email protected]
- Ensure that you are in your home directory (e.g.
/home/pi). - Clone the repository. You will be asked for your Github username and password.
$ git clone https://github.com/AylaNetworks/device_linux_gw_public.git
- View the new
/home/pi/device_linux_gw_publicsource directory.
Edit ayla_install.sh
- Copy ayla_install.sh to your home directory:
$ cp ~/device_linux_gw_public/dev_kit/raspberry_pi/ayla_install.sh ~/
- Open the file for editing, and find the following line:
ayla_src_dir="$temp_dir/ayla/src"
- Change it to the following, and save.
ayla_src_dir="/home/pi/device_linux_gw_public"
- Find the following:
ayla_package="https://github.com/AylaNetworks/device_linux_public.git"
- Change it to this:
ayla_package="https://github.com/AylaNetworks/device_linux_gw_public.git"
- Search for "OS is not the raspberrypi", and comment out the line:
# error_exit "OS is not the raspberrypi"
Simulator Gateway
The Simulator Gateway simulates sensor and thermostat nodes producing datapoints (e.g. temperature) every 15 seconds:
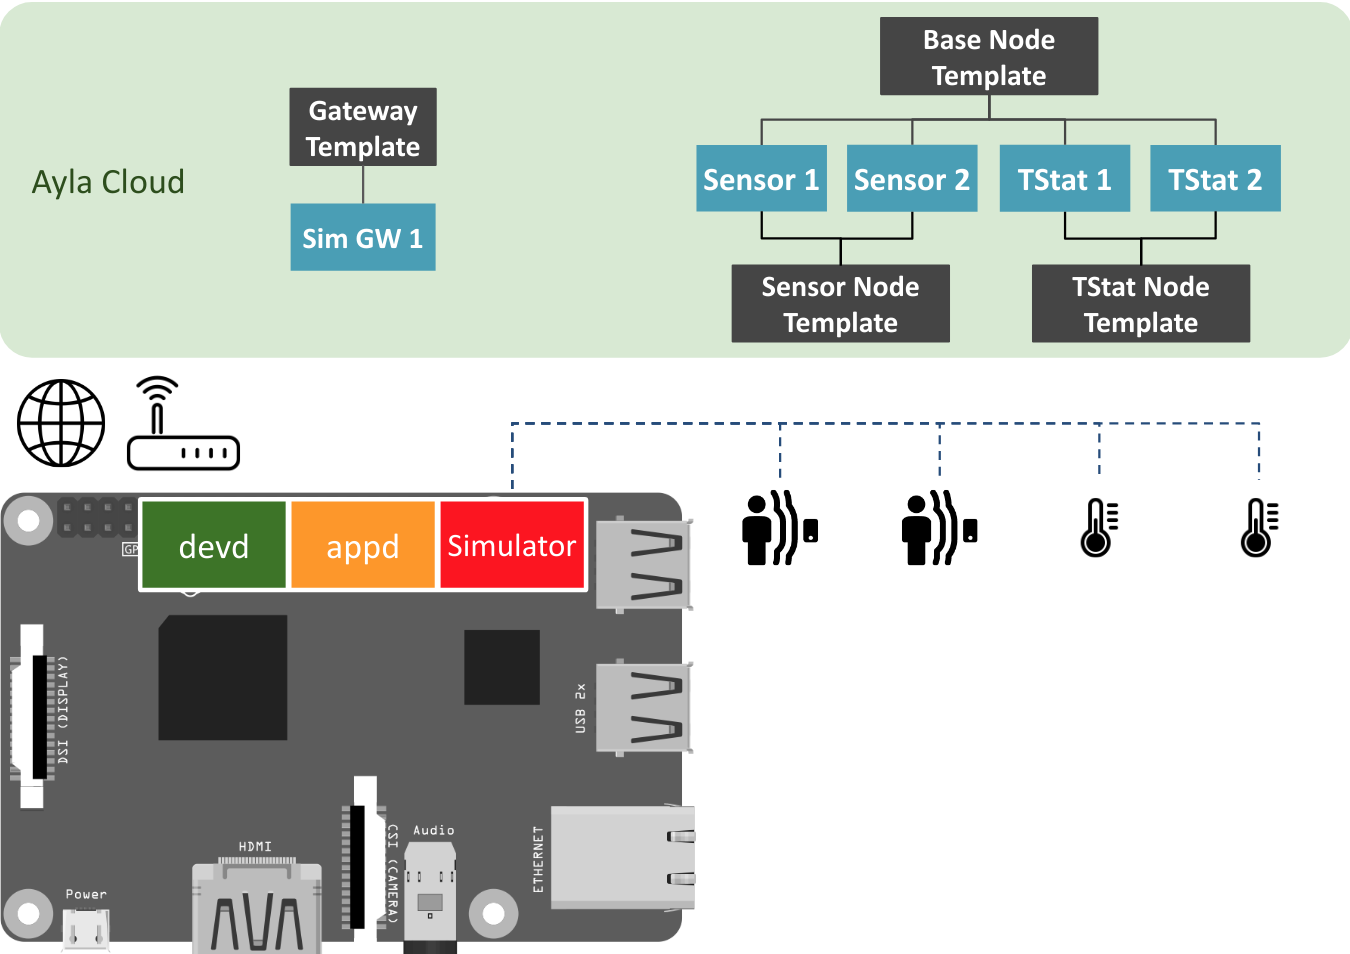
Note the following:
- The sensor and thermostat nodes exist only as simulations within the red box.
- The black shapes in the cloud represent templates which consist of attributes, properties, etc.
- The blue shapes are digital twins.
Create Simulator templates
Browse to the Ayla Developer Portal, and create the following templates.
Simulator Gateway template
| Visibility: | private |
| Name: | Sim GW |
| Description: | gatewayd |
| Registration: | Same-LAN |
| Model: | ggdemo |
| Version: | generic_gateway_demo 2.0 |
| Type: | Gateway |
| Gateway Type: | Generic |
After creating the template, copy & paste the following properties into a text file, and import the file.
base_type,direction,name,scope
integer,input,add_tstat_nodes,user
integer,input,add_sensor_nodes,user
integer,output,num_nodes,user
string,output,version,user
Click the new version property, check Host SW Version, and click OK.
Base Node template
| Visibility: | oem |
| Name: | Sim GW BNode |
| Description: | Base Node |
| Registration: | None |
| Model: | ggdemo |
| Template Key: | gg_sim |
| Version: | |
| Type: | Node |
After creating the template, copy & paste the following properties into a text file, and import the file.
base_type,direction,name,scope
boolean,input,enable,user
boolean,input,battery_enable,user
integer,output,battery_charge,user
Sensor Node template
| Visibility: | oem |
| Name: | Sim GW SNode |
| Description: | Sensor Node |
| Registration: | None |
| Model: | ggdemo |
| Template Key: | gg_sens |
| Version: | |
| Type: | Node |
After creating the template, copy & paste the following properties into a text file, and import the file.
base_type,direction,name,scope
decimal,output,temp,user
decimal,output,humidity,user
decimal,output,light_level,user
Thermostat Node template
| Visibility: | oem |
| Name: | Sim GW TNode |
| Description: | Thermostat Node |
| Registration: | None |
| Model: | ggdemo |
| Template Key: | gg_tstat |
| Version: | |
| Type: | Node |
After creating the template, copy & paste the following properties into a text file, and import the file.
base_type,direction,name,scope
integer,input,temp_setpoint,user
boolean,input,vacation_mode,user
decimal,output,local_temp,user
boolean,output,heat_on,user
boolean,output,ac_on,user
Install the Ayla Simulator Gateway
- Create a dummy
devd.conffile required byayla_install.sh:
$ touch devd.conf
- View installation options:
$ ./ayla_install.sh -h
- Start the installation. Wireless is the default mode. Wireless requires the -z flag.
$ sudo ./ayla_install.sh -z -a gatewayd
- Include
-zto install BLE support. - Include
-nto specify Ethernet (not Wi-Fi). - Include
-uto install over a previous installation.
- When the installation completes, do NOT reboot yet.
- Complete Configure your device in Ayla Linux Device Solution.
- Complete Connect & Register in Ayla Linux Device Solution.
Add Simulator nodes
This section shows you how to add sensor and thermostat nodes to your Simulator Gateway. Note the following:
- You add/delete nodes by setting the gateway "add_sensor_nodes" and "add_tstat_nodes" (Integer) properties.
- If you set one of these properties to 3, the Simulator Gateway will add three candidate nodes of that type.
- If you set one to -3, the gateway will delete three nodes of that type.
- Candidate nodes appear in the (Devices) Candidates tab. This is where you register them.
- The registration process associates a node with the appropriate template (that you made).
- Once registered, a candidate becomes a node, appearing in the (Devices) Nodes tab and on the Devices list.
Tail the messages log
Because, upon registration, sensor and thermostat nodes begin immediately to generate datapoints every 15 seconds, it makes sense to prepare to monitor node activity before adding nodes. Below are few ways to monitor node activity. To do so, secure shell to your RPi, and tail the messages log:
$ tail -f /var/log/messages
Nov 15 10:39:49 rpi appd: [info-app] appd_node_prop_send_handler: batching node property: sensor_sim_01::s1:gg_sens:temp = 55.331
Nov 15 10:39:49 rpi appd: [info-app] appd_node_prop_send_handler: batching node property: sensor_sim_01::s1:gg_sens:humidity = 59.640
Nov 15 10:39:49 rpi appd: [info-app] appd_node_prop_send_handler: batching node property: sensor_sim_01::s1:gg_sens:light_level = 71.107
Nov 15 10:39:49 rpi appd: [info-app] appd_node_ops_confirm_handler: node prop sensor_sim_01::s1:gg_sens:temp sent successfully to dests 01
Nov 15 10:39:49 rpi appd: [info-app] appd_node_ops_confirm_handler: node prop sensor_sim_01::s1:gg_sens:humidity sent successfully to dests 01
Nov 15 10:39:49 rpi appd: [info-app] appd_node_ops_confirm_handler: node prop sensor_sim_01::s1:gg_sens:light_level sent successfully to dests 01
Nov 15 10:40:00 rpi appd: [info-app] appd_node_prop_send_handler: batching node property: thermostat_sim_02::s1:gg_tstat:local_temp = 65.709
Nov 15 10:40:00 rpi appd: [info-app] appd_node_ops_confirm_handler: node prop thermostat_sim_02::s1:gg_tstat:local_temp sent successfully to dests 01
Also, in the Ayla Developer Portal, browse to View My Devices > A Sim GW Node > A Property > Datapoints. Once registered, a node will generate data every 15 seconds.
Add a sensor node
- Browse to the Ayla Developer Portal.
- Click View My Devices > Sim GW 1.
- Click Add Sensor Nodes, change Current Value to 1, and click OK.
- Pause for a few seconds. Current Value changes from 1 to 0.
- Click OK. Note that Number of Nodes is set to 1.
- Click (Devices) Nodes. The list is empty.
- Click (Devices) Candidates. The list contains one new candidate sensor node:

The serial number begin with "V" indicating that the node is a "virtual" device.
-
Click the Register link.
-
Click (Devices) Nodes to view the new node on the list.

-
Click View My Devices. The node appears on this list, too.

-
Click the new sensor node. The node properties list appears:
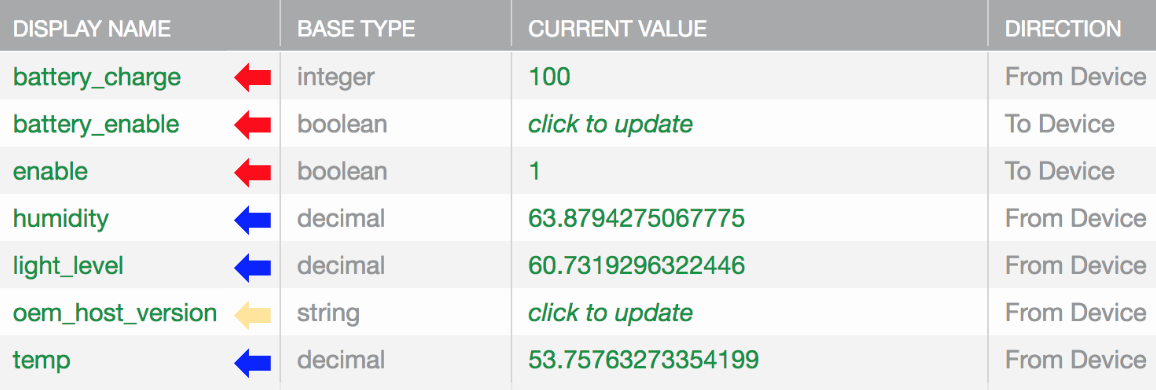
-
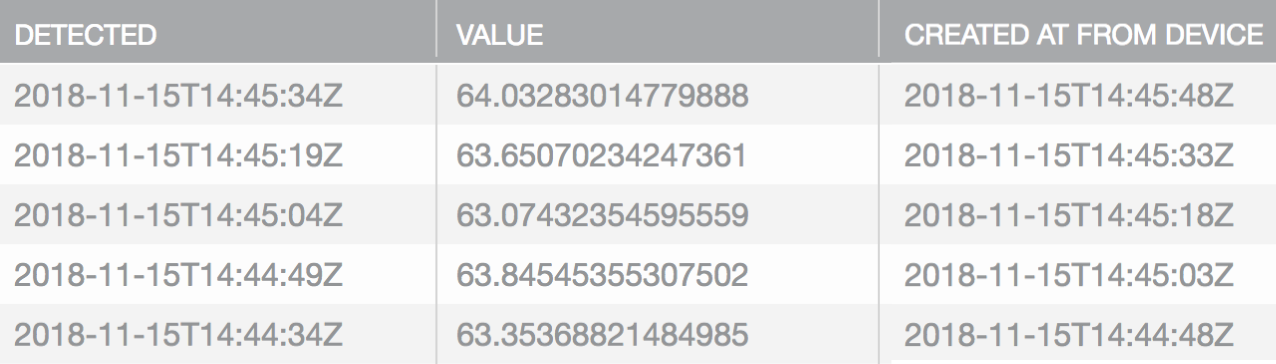
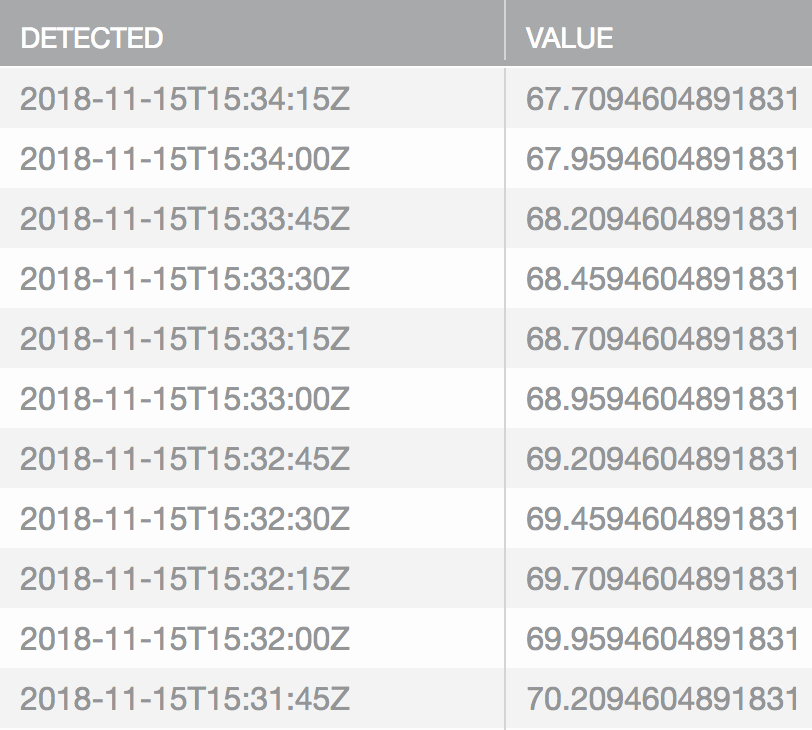
Click humidity > Datapoints to view accumulating data.
-
Click Details, and set Product Name to "Sim GW 1 SNode 1".
-
See the periodic updates in
/var/log/messages:
Nov 15 09:22:03 rpi appd: [info-app] appd_node_prop_send_handler: batching node property: sensor_sim_01::s1:gg_sens:temp = 53.767
Nov 15 09:22:03 rpi appd: [info-app] appd_node_prop_send_handler: batching node property: sensor_sim_01::s1:gg_sens:humidity = 63.059
Nov 15 09:22:03 rpi appd: [info-app] appd_node_prop_send_handler: batching node property: sensor_sim_01::s1:gg_sens:light_level = 56.244
Nov 15 09:22:04 rpi appd: [info-app] appd_node_ops_confirm_handler: node prop sensor_sim_01::s1:gg_sens:temp sent successfully to dests 01
Nov 15 09:22:04 rpi appd: [info-app] appd_node_ops_confirm_handler: node prop sensor_sim_01::s1:gg_sens:humidity sent successfully to dests 01
Nov 15 09:22:04 rpi appd: [info-app] appd_node_ops_confirm_handler: node prop sensor_sim_01::s1:gg_sens:light_level sent successfully to dests 01
Add a thermostat node
- Add a thermostat node in the same way you added a sensor node. Expect to find these properties.
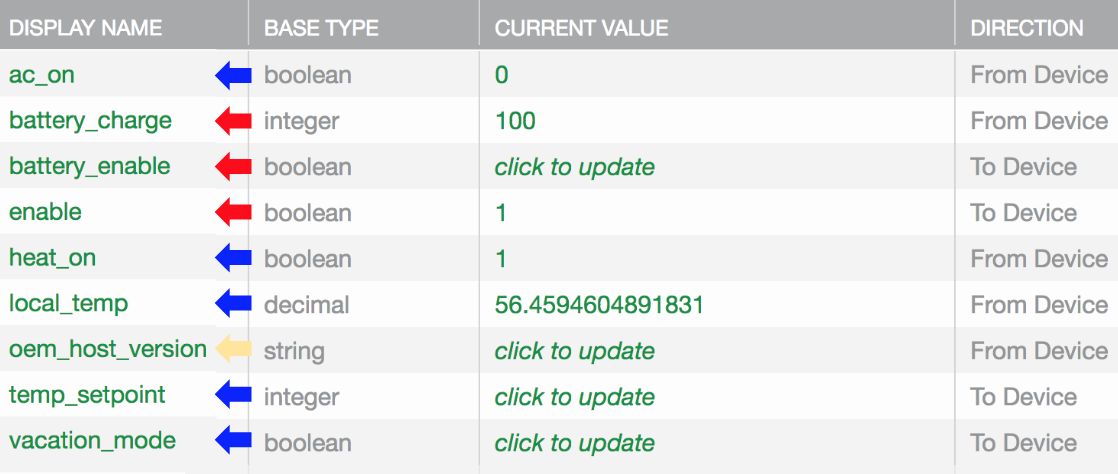
- Set the temp_setpoint property to a value (e.g. 70). Watch for datapoints from local_temp.
- Set vacation_mode to 1. heat_on changes to 0. Watch local_temp decrease:
Add multiple nodes
-
In the Ayla Developer Portal, click View My Devices > Sim GW 1.
-
Click the Add Sensor Nodes property.
-
Change the Current Value to 5, and click OK.
-
Click (Devices) Candidates. You may have to refresh because candidate creation takes a few seconds.
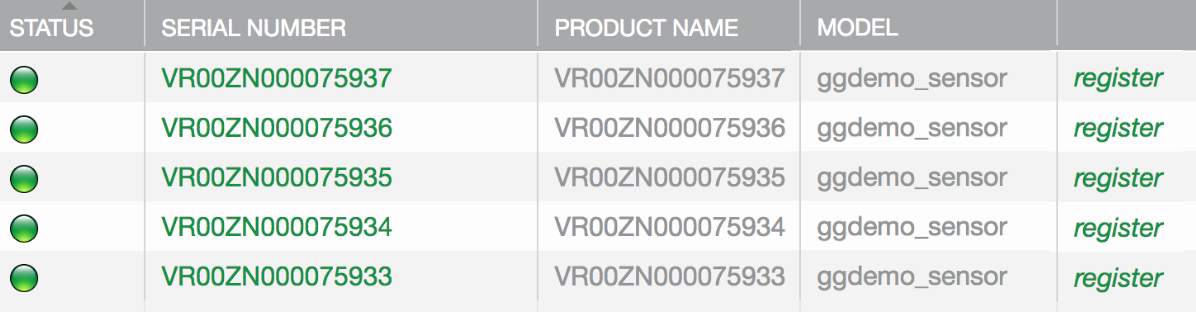
-
Click the register link for each candidate. Refresh the page (and click Candidates tab) between each registration.
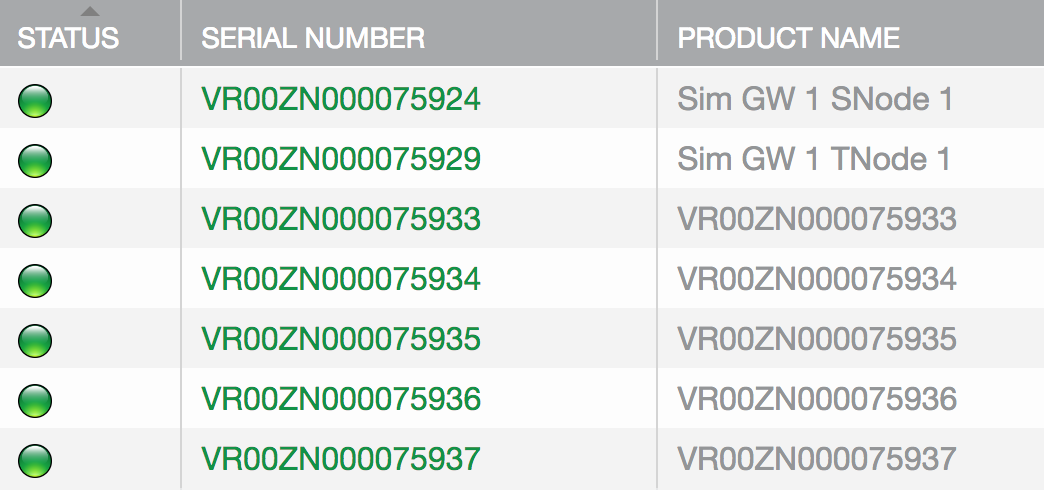
-
Click (Devices) Nodes. See the new nodes.
Inspect startup files
For startup purposes, the gateway keeps track of nodes in two startup files: devd.conf.startup and appd.conf.startup. Both are located in ∼/ayla/config. A node is composed of one or more subdevices identified by a key (e.g. s1). One or more templates contribute properties to a subdevice. See the diagram.

The s1:gg_sim:battery_charge:
s1is the subdomain name.gg_simis the template key name.battery_chargeis the property name as defined in the application.
To inspect the origin of gg_sim, gg_sens, and gg_tstat property names, browse to node_sim.c (To view this file, contact your Ayla Representative to set up an Ayla GitHub account), and search for the sim_template_sim, sim_template_sensor, and sim_template_tstat arrays:
static const struct sim_node_prop_def const sim_template_sim[] = \{
  \{\{"enable", PROP_BOOLEAN, PROP_TO_DEVICE}, sim_node_prop_init_enable},
  \{\{"battery_enable", PROP_BOOLEAN, PROP_TO_DEVICE}, NULL, sim_node_prop_battery_enable_set},
  \{\{"battery_charge", PROP_INTEGER, PROP_FROM_DEVICE}, sim_node_prop_init_battery_charge }
};

static const struct sim_node_prop_def const sim_template_tstat[] = \{
  \{\{"temp_setpoint",  PROP_INTEGER, PROP_TO_DEVICE}, sim_node_prop_init_temp_setpoint, sim_node_prop_update_tstat},
  \{\{"vacation_mode",  PROP_BOOLEAN, PROP_TO_DEVICE}, NULL, sim_node_prop_update_tstat},
  \{\{"local_temp", PROP_DECIMAL, PROP_FROM_DEVICE}, sim_node_prop_init_local_temp},
  \{\{"heat_on",  PROP_BOOLEAN, PROP_FROM_DEVICE}},
  \{\{"ac_on",  PROP_BOOLEAN, PROP_FROM_DEVICE}}
};

static const struct sim_node_prop_def const sim_template_sensor[] = \{
  \{\{"temp", PROP_DECIMAL, PROP_FROM_DEVICE}},
  \{\{"humidity", PROP_DECIMAL, PROP_FROM_DEVICE}},
  \{\{"light_level", PROP_DECIMAL, PROP_FROM_DEVICE}},
};
Bluetooth Gateway
The Bluetooth Gateway connects BLE devices to the Ayla Cloud:
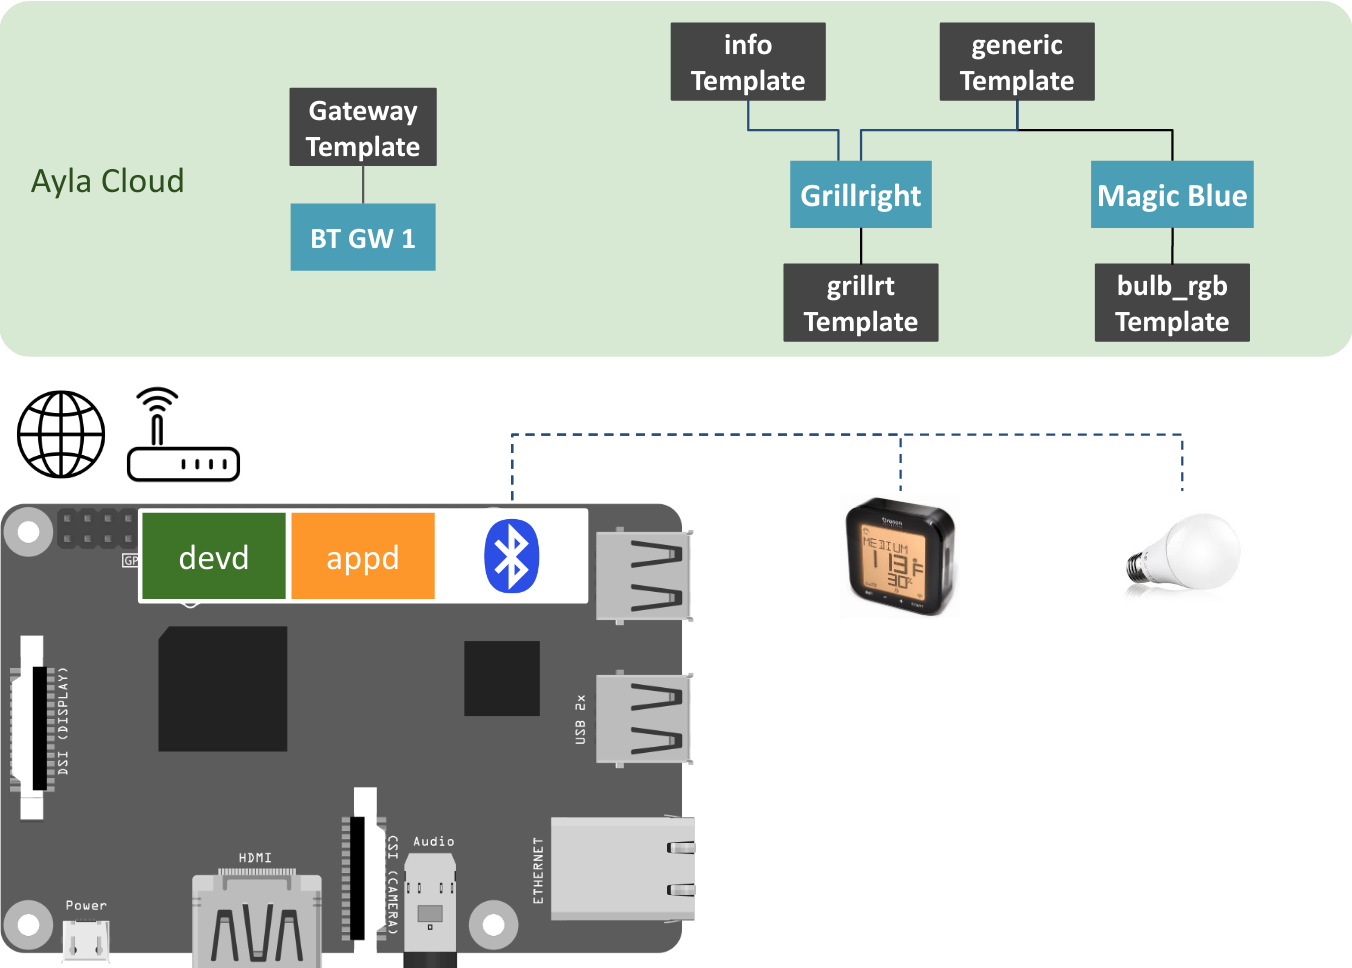
Note the following:
- The black shapes in the cloud represent templates which consist of attributes, properties, etc.
- The blue shapes are digital twins.
- bt_gatewayd supports the following devices out-of-the-box:
- MovingTech 4.5W LED Bluetooth Bulb
- Oregon Scientific AW133 Grill Right Bluetooth BBQ Thermometer
- Nordic Semiconductor Multiprotocol Bluetooth LE Proprietary System-on-Chip
Create Bluetooth templates
Browse to the Ayla Developer Portal, and create the following templates.
Bluetooth Gateway template
| Visibility: | oem |
| Name: | BT GW |
| Description: | bt_gatewayd |
| Registration: | Same-LAN |
| Model: | linuxevb |
| Version: | bluetooth_gateway_demo_v1.2 |
| Type: | Gateway |
| Gateway Type: | Generic |
After creating the template, copy & paste the following properties into a text file, and import the file.
base_type,direction,name,scope
integer,input,bt_scan_enable,user
boolean,output,bt_scan_status,user
string,input,bt_connect_id,user
string,output,bt_connect_result,user
string,input,bt_disconnect_id,user
string,output,bt_disconnect_result,user
integer,input,bt_connect_passkey,user
string,output,bt_connect_passkey_display,user
string,output,bt_scan_results,user
integer,output,num_nodes,user
string,output,version,user
Click the new version property, check Host SW Version, and click OK.
Generic Node template
| Visibility: | oem |
| Name: | BT GW Generic |
| Description: | Generic Node |
| Registration: | None |
| Model: | linuxevb |
| Template Key: | generic |
| Version: | |
| Type: | Node |
After creating the template, copy & paste the following properties into a text file, and import the file.
base_type,direction,name,scope
string,output,Name,user
string,output,Icon,user
integer,output,Class,user
integer,output,Appearance,user
string,input,Alias,user
Info Node template
| Visibility: | oem |
| Name: | BT GW Info |
| Description: | Info Node |
| Registration: | None |
| Model: | linuxevb |
| Template Key: | info |
| Version: | |
| Type: | Node |
After creating the template, copy & paste the following properties into a text file, and import the file.
base_type,direction,name,scope
string,output,mfg_name,user
string,output,model_num,user
string,output,serial_num,user
string,output,hw_revision,user
string,output,fw_revision,user
string,output,sw_revision,user
string,output,system_id,user
Grillright Node template
| Visibility: | oem |
| Name: | BT GW Grillright |
| Description: | Grillright Node |
| Registration: | None |
| Model: | linuxevb |
| Template Key: | grillrt |
| Version: | 1.2 |
| Type: | Node |
After creating the template, copy & paste the following properties into a text file, and import the file.
base_type,direction,name,scope
integer,output,ALARM,user
string,input,COMMAND,user
integer,output,CONTROL_MODE,user
boolean,output,COOKING,user
string,output,TIME,user
integer,output,DONENESS,user
integer,output,MEAT,user
integer,output,PCT_DONE,user
integer,output,TARGET_TEMP,user
string,output,TARGET_TIME,user
decimal,output,TEMP,user
Bulb RGB Node template
| Visibility: | oem |
| Name: | BT GW Magic Blue |
| Description: | Magic Blue Node |
| Registration: | None |
| Model: | linuxevb |
| Template Key: | bulb_rgb |
| Version: | 1.5 |
| Type: | Node |
After creating the template, copy & paste the following properties into a text file, and import the file.
base_type,direction,name,scope
integer,input,mode,user
boolean,input,onoff,user
integer,input,rgb,user
integer,input,white,user
integer,input,fade,user
integer,input,fade_rate,user
Install the Ayla Bluetooth Gateway
- Create a dummy
devd.conffile required byayla_install.sh:
$ touch devd.conf
- View installation options:
$ ./ayla_install.sh -h
- Start the installation. Wireless is the default mode.
$ sudo ./ayla_install.sh -z -a bt_gatewayd
- Include
-zto install BLE support. - Include
-nto specify Ethernet (not Wi-Fi). - Include
-uto install over a previous installation.
- When the installation completes, do NOT reboot yet.
- Complete Configure your device in Ayla Linux Device Solution.
- Complete Connect & Register in Ayla Linux Device Solution.
Add Grillright node
Reset the Grillright
- Remove the batteries.
- Wait a minute.
- Reinstall the batteries.
- Use a paperclip to reset the device.
Test RPi-to-device communication
-
In your RPi Secure Shell, run the following:
$ sudo bluetoothctl # help Menu main: Available commands: advertise Advertise Options Submenu scan Scan Options Submenu gatt Generic Attribute Submenu list List available controllers show [ctrl] Controller information select <ctrl> Select default controller devices List available devices paired-devices List paired devices system-alias <name> Set controller alias reset-alias Reset controller alias power <on/off> Set controller power pairable <on/off> Set controller pairable mode discoverable <on/off> Set controller discoverable mode agent <on/off/capability> Enable/disable agent with given capability default-agent Set agent as the default one advertise <on/off/type> Enable/disable advertising with given type set-alias <alias> Set device alias scan <on/off> Scan for devices info [dev] Device information pair [dev] Pair with device trust [dev] Trust device untrust [dev] Untrust device block [dev] Block device unblock [dev] Unblock device remove <dev> Remove device connect <dev> Connect device disconnect [dev] Disconnect device menu <name> Select submenu version Display version quit Quit program exit Quit program help Display help about this program -
Scan for nearby Bluetooth devices, and verify that the MAC address of your Grillright device is returned.
    # agent on
    # default-agent
    # scan on
    Discovery started
    [CHG] Controller B8:27:EB:80:7B:CC Discovering: yes
    [CHG] Device E6:E5:C0:FA:A0:ED RSSI: -49
    # scan off
In this case, E6:E5:C0:FA:A0:ED is a Grillright Mac address.
- Exit the utility.
Add the node
- In your RPi Secure Shell, prepare to monitor your progress by tailing the syslog file:
$ sudo tail -f /var/log/syslog
-
In the Ayla Developer Portal, click View My Devices. A list of devices appears.1. Click the Serial Number of your gateway. A list of properties appears.
-
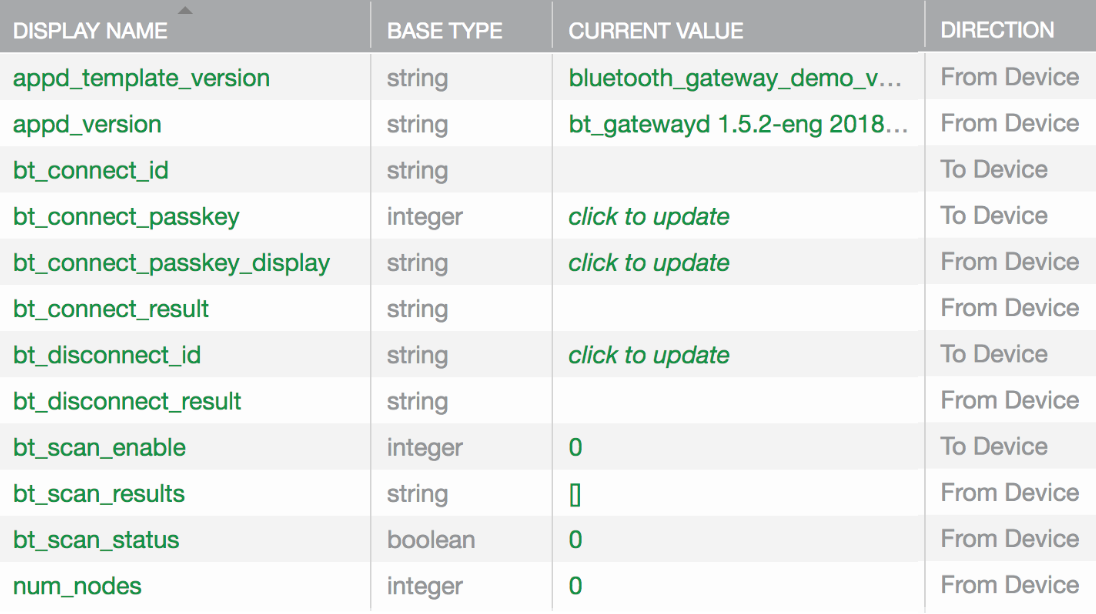
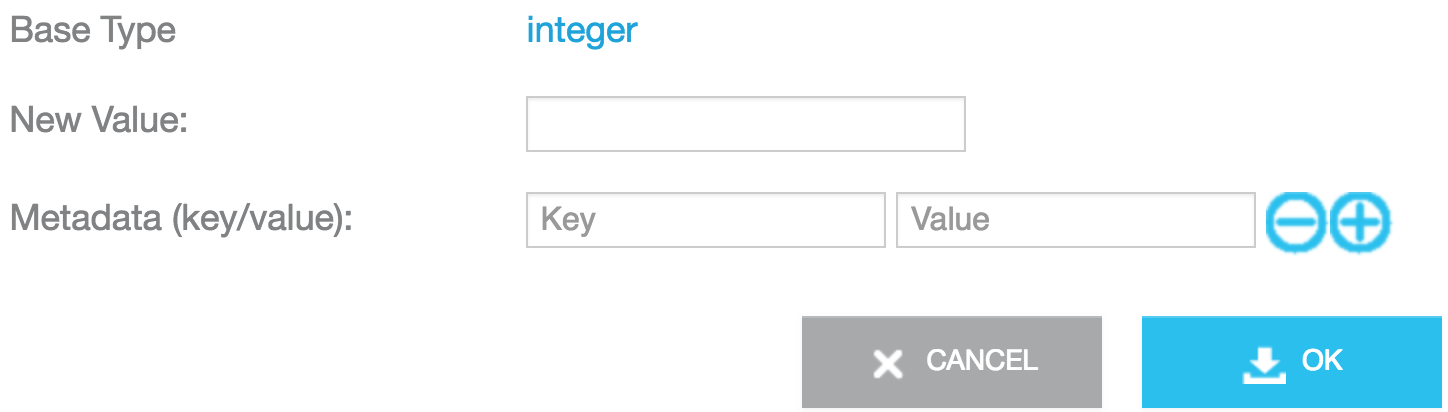
Click the Current Value column of the
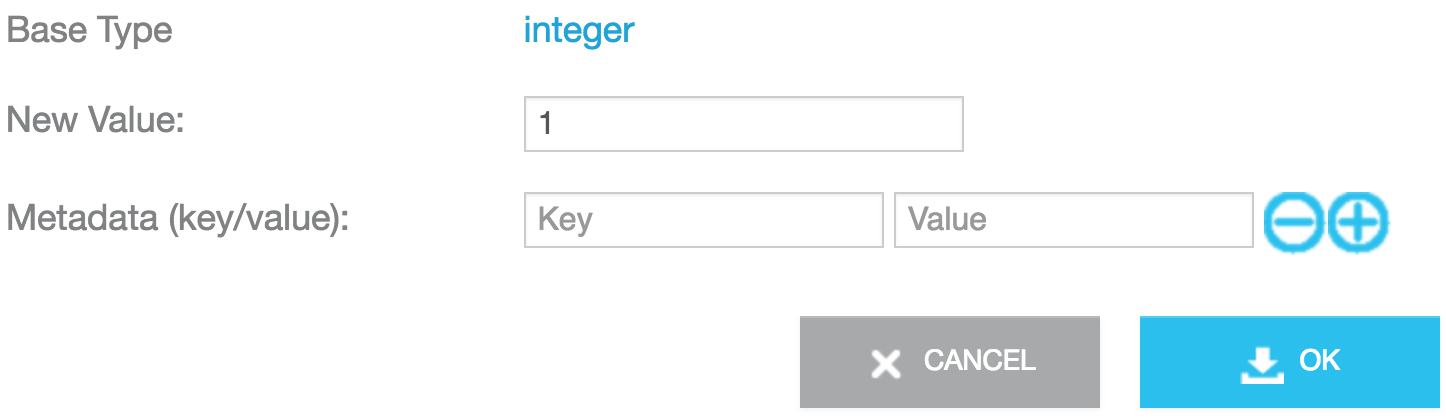
bt_scan_enableproperty.1. Set New Value to 1, click OK:

The bt_scan_results property value should return the MAC addresses of bluetooth devices near your Raspberry Pi. One of these MAC addresses represents your Grillright. Sometimes, the results display. Often then don't.

If the results do display, they disappear quickly as the ```bt_scan_results``` property value updates to an empty array:

-
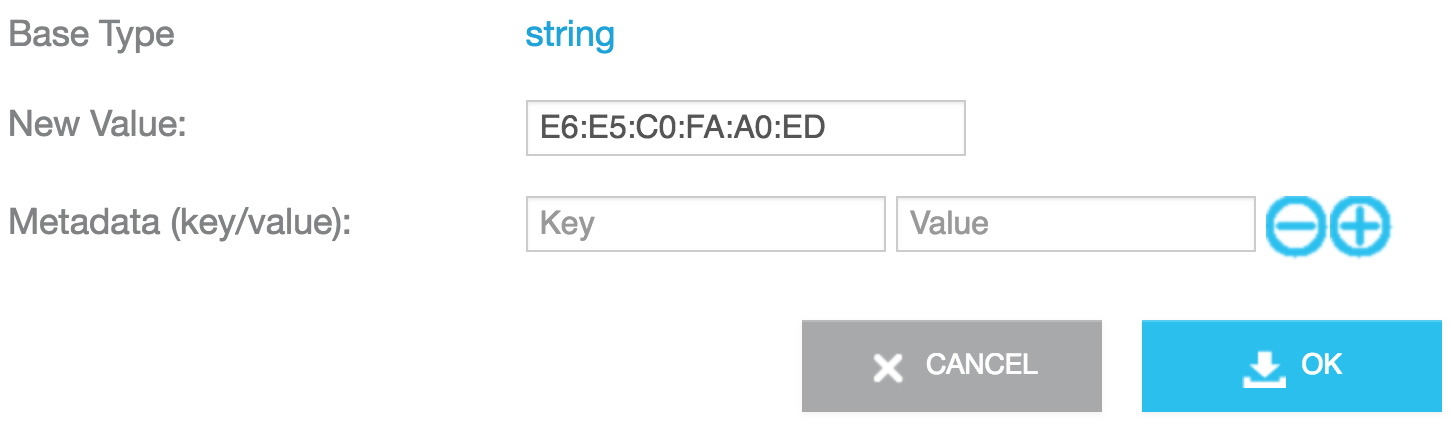
Identify the MAC address of your Grillright. There are two quick ways to do this: (1) Search for "bd_addr" in syslog, or (2) use the Ayla Dashboard Portal to view the Datapoints for the
bt_scan_resultsproperty.1. In the Ayla Developer Portal, , click the Current Value column of thebt_connect_idproperty.1. Set New Value to the discovered MAC address, and click OK.
-
Verify that the num_nodes property value is 1:

-
Click the Candidates tab, verify that the Grillright candidate exists, and click Register:

-
Click the Nodes tab to see the new node on the list.

-
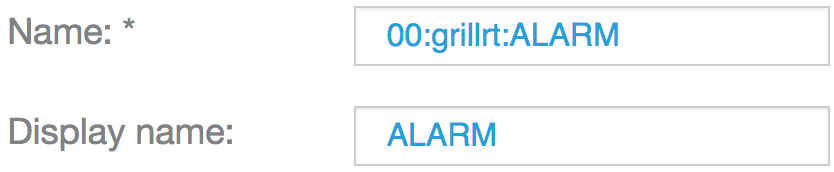
Click the Serial Number to display the Grillright node properties:
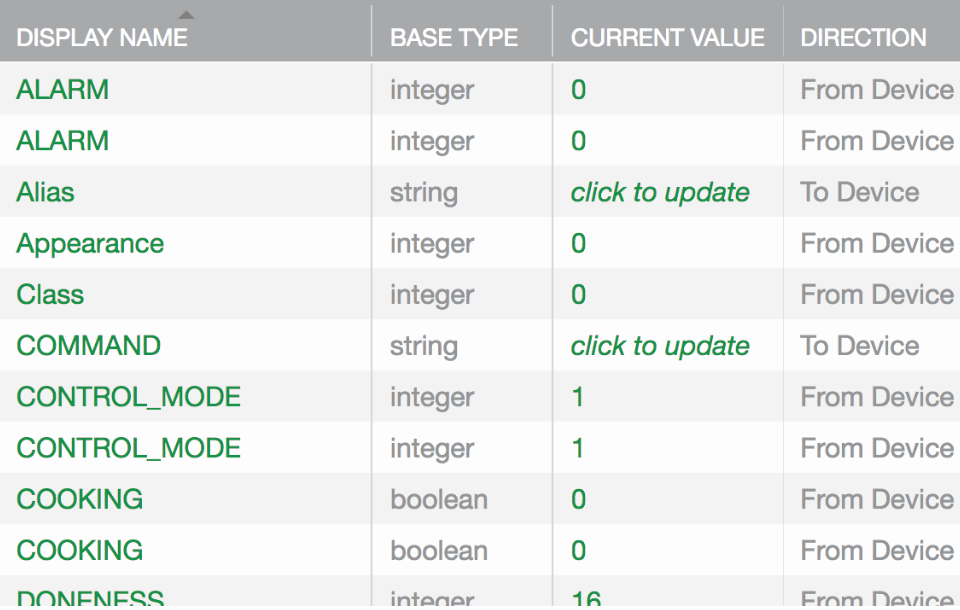
Many of the properties appear to be duplicates (e.g. ALARM, CONTROL_MODE). This is not the case. The Grillright has two sensors, and each sensor requires its own set of properties. The property names on the list are Display Names. The actual Name of each property (e.g. 00:grillrt:ALARM) is unique.
-
Click one of the ALARM properties to see the actual name:
-
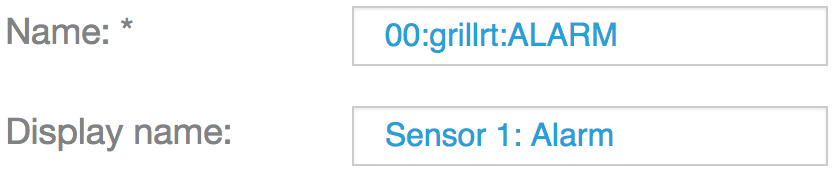
Change the Display Name, and save:
-
Rename the other properties as needed.
Test node properties
-
In the Ayla Developer Portal, click View My Devices. A list of devices appears.1. Click the DSN of the Grillright node.1. Click the
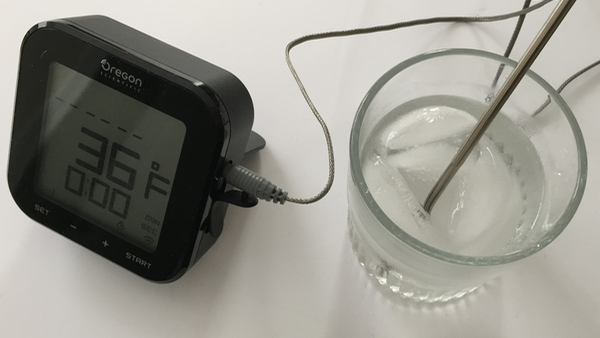
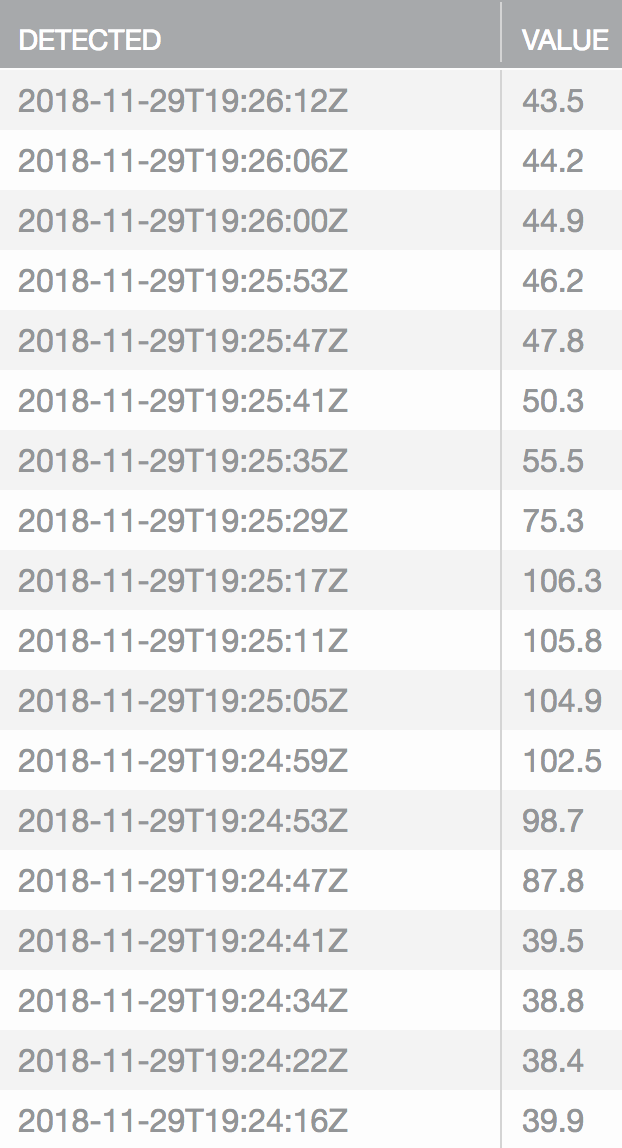
Sensor 1: Tempproperty, and click Datapoints.1. Connect the probe to the Grillright
-
Put the probe into cold/hot water, and observe the new datapoints.
-
Click the
Sensor 1: Control Modeproperty, and click Datapoints.1. On the Grillright device, touchSet, and then touch+several times to rotate through the control modes.1. Observe the new datapoints.1. Click theSensor 1: Alarmproperty, and click Datapoints.1. On the Grillright device, touchSet.1. Touch+until the control mode isTimer.1. Set the timer for a short duration, and start the timer.1. When the timer beeps, observe the new datapoints.
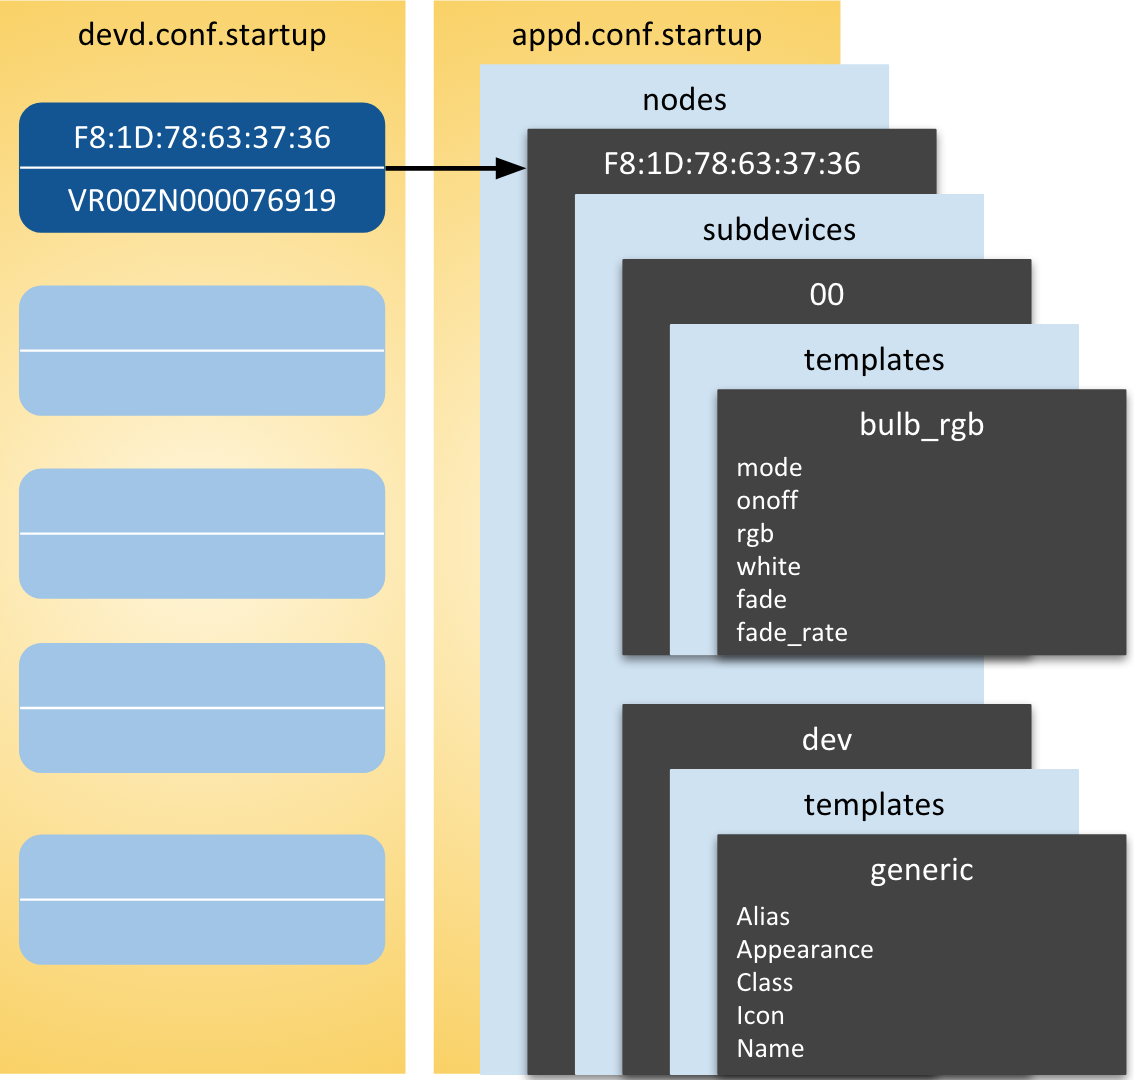
Startup files
For startup purposes, the gateway keeps track of nodes in two startup files: devd.conf.startup and appd.conf.startup. Both are located in ∼/ayla/config. A node is composed of one or more subdevices identified by a key (e.g. 00). One or more templates contribute properties to a subdevice. See the diagram.
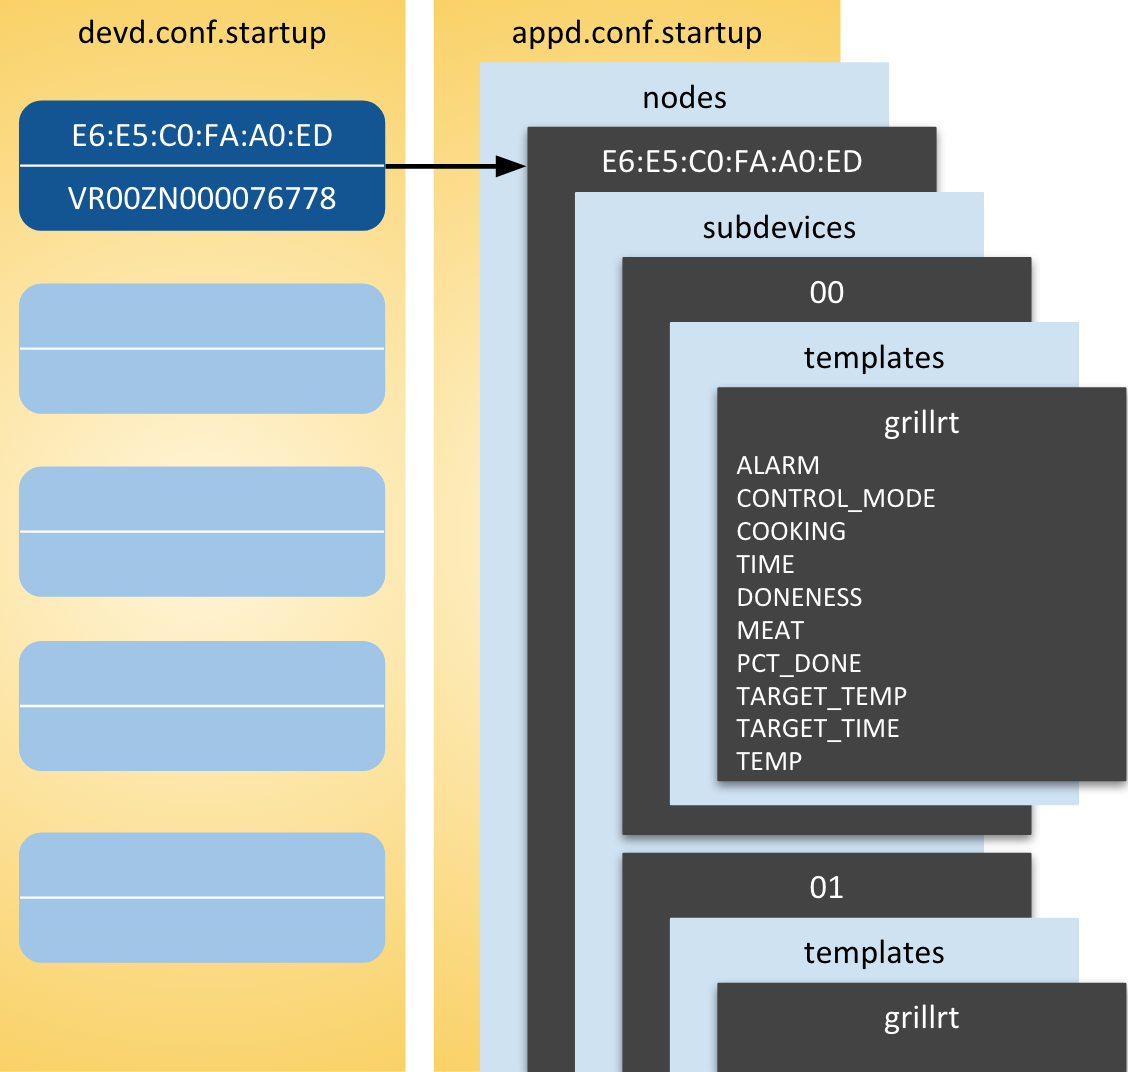
The 00:grillrt:ALARM:
00is the subdomain name.grillrtis the template key name.ALARMis the property name as defined in the application.
To inspect the origin of grillrt property names, browse to bt_gatt.c (To view this file, contact your Ayla Representative to set up an Ayla GitHub account), and search for the bt_gatt_init_grillright function:
static int bt_gatt_init_grillright(void)
{
  int rc = 0;

  struct bt_gatt_prop_table_entry sensor_props[] = \{
    { "ALARM", PROP_INTEGER, PROP_FROM_DEVICE, NULL, bt_gatt_val_send_grillright_alarm },
    { "CONTROL_MODE", PROP_INTEGER, PROP_FROM_DEVICE, NULL, bt_gatt_val_send_grillright_control_mode },
    { "COOKING", PROP_BOOLEAN, PROP_FROM_DEVICE, NULL, bt_gatt_val_send_grillright_cooking },
    { "TIME", PROP_STRING, PROP_FROM_DEVICE, NULL, bt_gatt_val_send_grillright_time },
    { "DONENESS", PROP_INTEGER, PROP_FROM_DEVICE, NULL, bt_gatt_val_send_grillright_doneness },
    { "MEAT", PROP_INTEGER, PROP_FROM_DEVICE, NULL, bt_gatt_val_send_grillright_meat },
    { "PCT_DONE", PROP_INTEGER, PROP_FROM_DEVICE, NULL, bt_gatt_val_send_grillright_pct_done },
    { "TARGET_TEMP", PROP_INTEGER, PROP_FROM_DEVICE, NULL, bt_gatt_val_send_grillright_target_temp },
    { "TARGET_TIME", PROP_STRING, PROP_FROM_DEVICE, NULL, bt_gatt_val_send_grillright_target_time },
    { "TEMP", PROP_DECIMAL, PROP_FROM_DEVICE, NULL, bt_gatt_val_send_grillright_temp }
  };

  rc |= bt_gatt_db_add_template("2899fe00-c277-48a8-91cb-b29ab0f01ac4", "grillrt", "1.2");

  rc |= bt_gatt_db_add_prop("28998e03-c277-48a8-91cb-b29ab0f01ac4", "ctl", "COMMAND", PROP_STRING, PROP_TO_DEVICE, NULL, NULL);
  rc |= bt_gatt_add_prop_table("28998e10-c277-48a8-91cb-b29ab0f01ac4", "00", sensor_props, ARRAY_LEN(sensor_props));
  rc |= bt_gatt_add_prop_table("28998e11-c277-48a8-91cb-b29ab0f01ac4", "01", sensor_props, ARRAY_LEN(sensor_props));
  return rc;
}
Add Magic Blue node
Turn on the bulb
Verify that the bulb is screwed into a lamp socket, and that the lamp is turned on.
Test RPi-to-device communication
-
In your RPi Secure Shell, run the following:
$ sudo bluetoothctl # help Menu main: Available commands: advertise Advertise Options Submenu scan Scan Options Submenu gatt Generic Attribute Submenu list List available controllers show [ctrl] Controller information select <ctrl> Select default controller devices List available devices paired-devices List paired devices system-alias <name> Set controller alias reset-alias Reset controller alias power <on/off> Set controller power pairable <on/off> Set controller pairable mode discoverable <on/off> Set controller discoverable mode agent <on/off/capability> Enable/disable agent with given capability default-agent Set agent as the default one advertise <on/off/type> Enable/disable advertising with given type set-alias <alias> Set device alias scan <on/off> Scan for devices info [dev] Device information pair [dev] Pair with device trust [dev] Trust device untrust [dev] Untrust device block [dev] Block device unblock [dev] Unblock device remove <dev> Remove device connect <dev> Connect device disconnect [dev] Disconnect device menu <name> Select submenu version Display version quit Quit program exit Quit program help Display help about this program -
Scan for nearby Bluetooth devices, and verify that the MAC address of your Magic Blue device is returned.
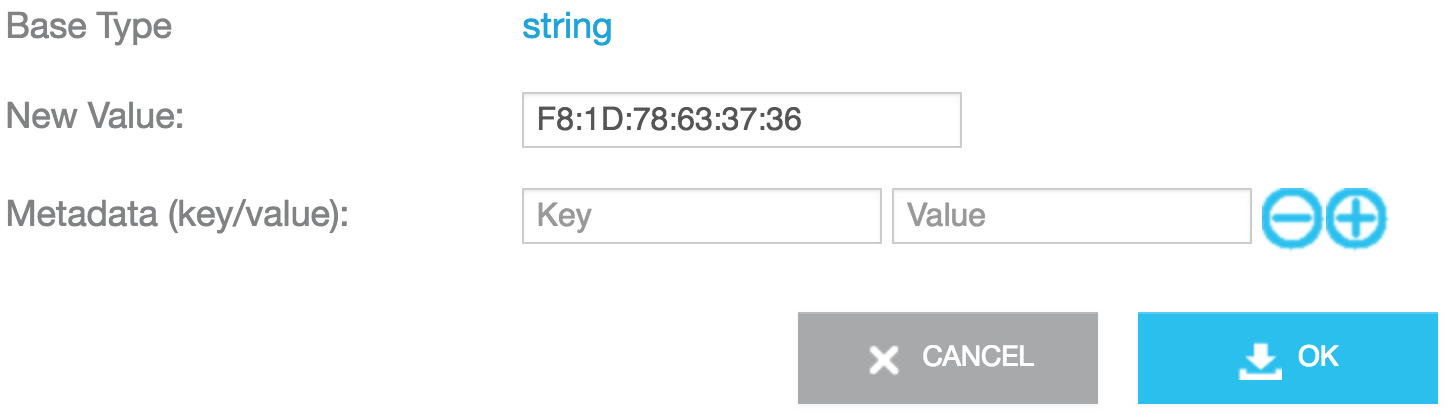
# agent on
# default-agent
# scan on
Discovery started
[CHG] Controller B8:27:EB:80:7B:CC Discovering: yes
[NEW] Device F8:1D:78:63:37:36 LEDBLE-78633736
[CHG] Device E6:E5:C0:FA:A0:ED RSSI: -42
# scan off
F8:1D:78:63:37:36 is a Magic Blue Mac address.- Exit the utility.
Add the node
- In your RPi Secure Shell, prepare to monitor your progress by tailing the syslog file:
$ sudo tail -f /var/log/syslog
-
In the Ayla Developer Portal, click View My Devices. A list of devices appears.1. Click the Serial Number of your gateway. A list of properties appears.

-
Click the Current Value column of the bt_scan_enable property.1. Set New Value to 1, click OK:


-
Identify the MAC address of your Magic Blue bulb. There are two quick ways to do this: (1) Search for "bd_addr" in syslog, or (2) use the Ayla Dashboard Portal to view the Datapoints for the bt_scan_results property.1. In the Ayla Developer Portal, , click the Current Value column of the bt_connect_id property.1. Set New Value to the discovered MAC address, and click OK.
-
Verify that the num_nodes property value is 1:

-
Click the Candidates tab, verify that the Magic Blue candidate exists, and click Register:

-
Click the Nodes tab to see the new node on the list.

-
Click the Serial Number to display the Magic Blue node properties:
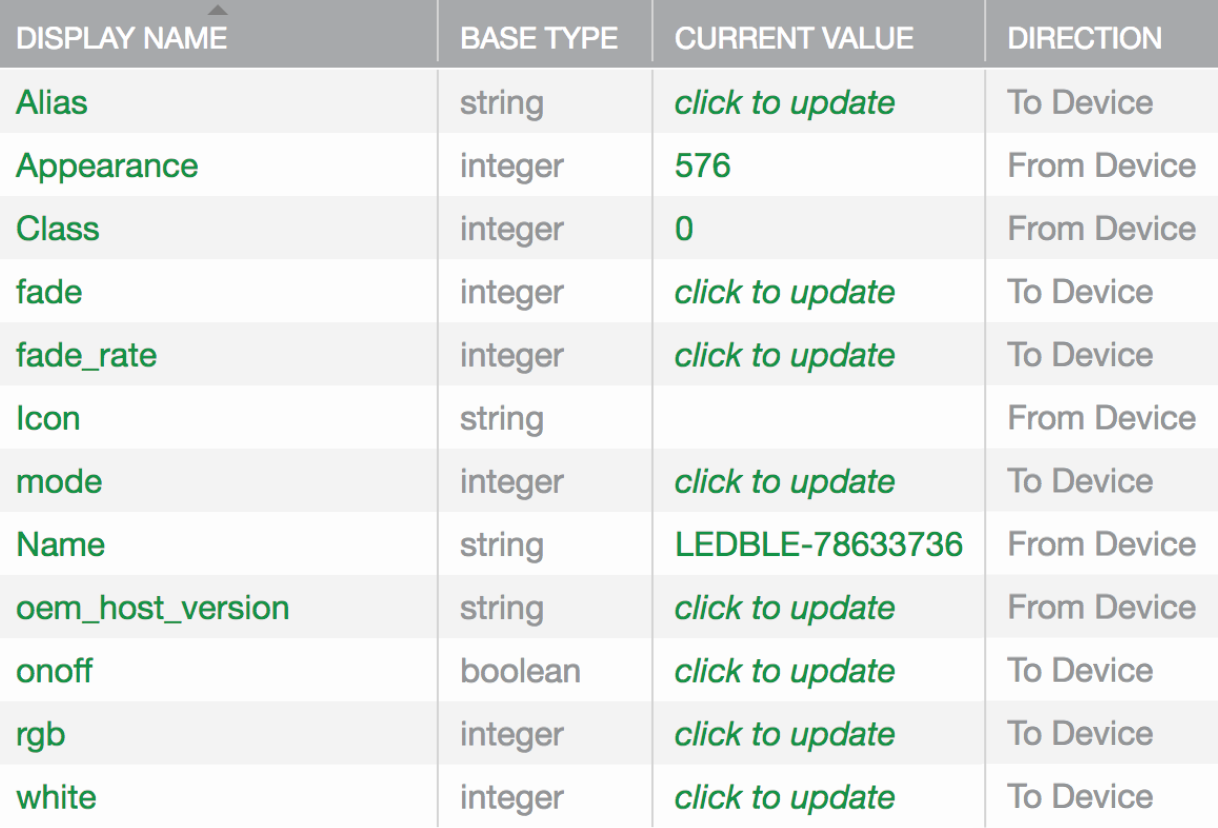
Note that although the digital twin Display Names are the same as the Display Names specified in the templates, the actual property names have been modified to specify the subdevice and template (e.g. 00:bulb_rgb:onoff).
Test node properties
- In the Ayla Developer Portal, click View My Devices. A list of devices appears.
- Click the DSN of the Magic Blue node.1. Click the
onoffproperty, change the value to 1, and click OK. The bulb should go on. - Click the
modeproperty, change the value to 3, and click OK. For definitions, seebt_gatt_bulb_modein bt_gatt.c. - Click the
fadeproperty, change the value to 3, and click OK. For definitions, seebt_gatt_bulb_fadein bt_gatt.c. - Click the
fade_rateproperty, change the value to 80, and click OK. For ranges, seeMagic blue bulb value rangein bt_gatt.c.
Startup files
For startup purposes, the gateway keeps track of nodes in two startup files: devd.conf.startup and appd.conf.startup. Both are located in ∼/ayla/config. A node is composed of one or more subdevices identified by a key (e.g. 00). One or more templates contribute properties to a subdevice. See the diagram.
The 00:bulb_rgb:onoff:
00is the subdomain name.bulb_rgbis the template key name.onoffis the property name as defined in the application.
To inspect the origin of bulb_rgb property names, browse to bt_gatt.c, and search for the bt_gatt_init_bulb_rgb function:
static int bt_gatt_init_bulb_rgb(void)
\{
  int rc = 0;
  const char *subdevice = NULL;

  rc |= bt_gatt_db_add_template("ffe5", BT_GATT_BULB_TEMPLATE, "1.5");
  rc |= bt_gatt_db_add_prop("ffe9", subdevice, "mode", PROP_INTEGER, PROP_TO_DEVICE, bt_gatt_val_set_bulb_mode, NULL);
  rc |= bt_gatt_db_add_prop("ffe9", subdevice, "onoff", PROP_BOOLEAN, PROP_TO_DEVICE, bt_gatt_val_set_bulb_onoff, NULL);
  rc |= bt_gatt_db_add_prop("ffe9", subdevice, "rgb", PROP_INTEGER, PROP_TO_DEVICE, bt_gatt_val_set_bulb_rgb, NULL);
  rc |= bt_gatt_db_add_prop("ffe9", subdevice, "white", PROP_INTEGER, PROP_TO_DEVICE, bt_gatt_val_set_bulb_white, NULL);
  rc |= bt_gatt_db_add_prop("ffe9", subdevice, "fade", PROP_INTEGER, PROP_TO_DEVICE, bt_gatt_val_set_bulb_fade, NULL);
  rc |= bt_gatt_db_add_prop("ffe9", subdevice, "fade_rate", PROP_INTEGER, PROP_TO_DEVICE, bt_gatt_val_set_bulb_fade_rate, NULL);
  return rc;
}
Zigbee Gateway
The Zigbee Gateway connects Zigbee devices to the Ayla Cloud:
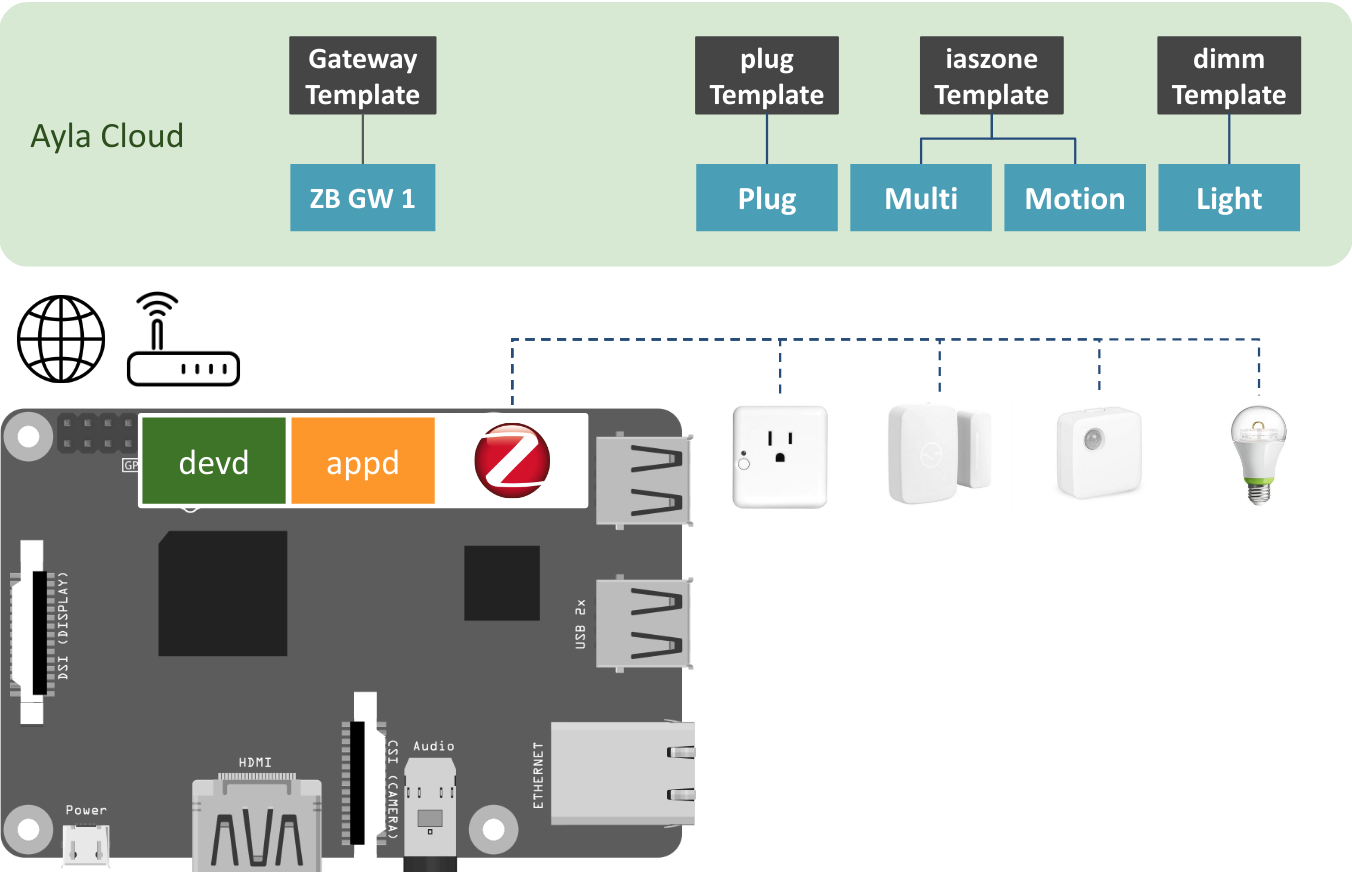
Note the following:
- The black shapes in the cloud represent templates which consist of attributes, properties, etc.
- The blue shapes are digital twins.
- zb_gatewayd supports the following devices out-of-the-box:
a. GE Link Smart LED Light Bulb
b. Samsung SmartThings Outlet
c. Samsung SmartThings Multipurpose Sensor
d. Samsung SmartThings Motion Sensor
e. Centralite 3-Series Pearl Touch Thermostat
Install Zigbee stack
While Raspberry Pi 3 supports Bluetooth natively, it does not support Zigbee out of the box. Adding support to an RPi for a Zigbee network means adding a USB stick and a software stack. Here is one approach:
-
Buy a Cel MeshConnect EM358 USB Stick, and install it in a USB recepticle on your RPi.1. Download Simplicity Studio IDE v4 onto your computer, and use it to register and download EmberZNet Protocol Stack. Export the Zigbee stack:
app esf_common hardware kit reference_design platform CMSIS Device base emdrv emlib middleware radio protocol zigbee_5.7 app build documentation esf.properties ncp-images stack stack.properties tool unins000.dat unins000.exe -
Copy the stack to
/home/pi/EmberZNet/v5.7.4.0on your RPi:$ ls -1 ~/EmberZNet/v5.7.4.0/ app hardware platform protocol
Create Zigbee templates
Browse to the Ayla Developer Portal, and create the following templates.
Zigbee Gateway template
| Visibility: | oem |
| Name: | ZB GW |
| Description: | zb_gatewayd |
| Registration: | Same-LAN |
| Model: | linuxevb |
| Version: | zigbee_gateway_demo_v1.1 |
| Type: | Gateway |
| Gateway Type: | Generic |
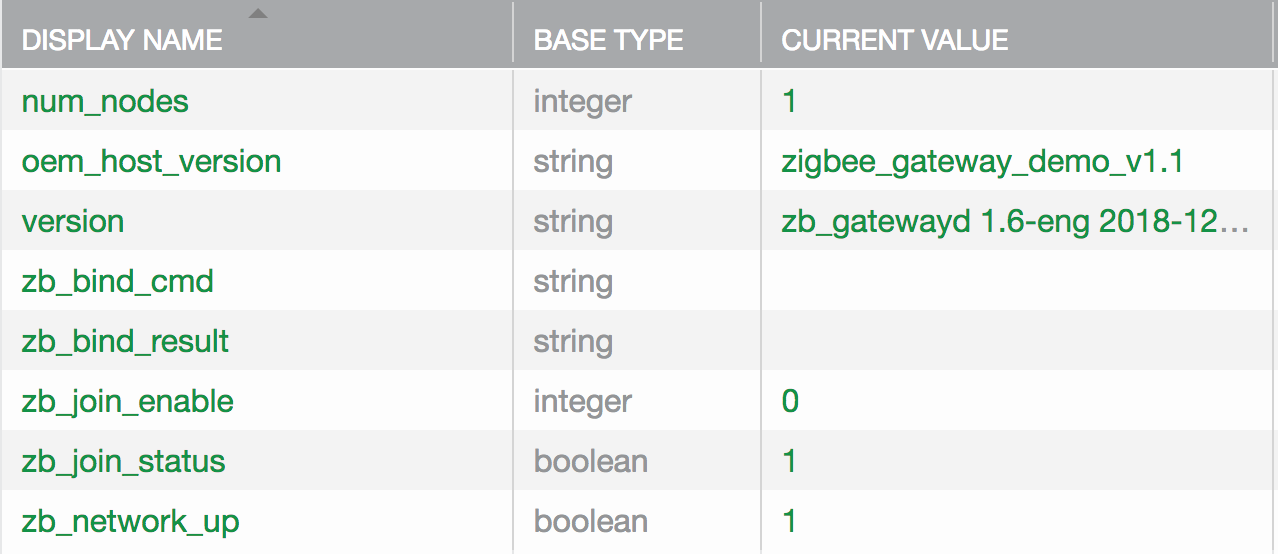
After creating the template, copy & paste the following properties into a text file, and import the file.
base_type,direction,name,scope
integer,output,num_nodes,user
integer,input,zb_join_enable,user
boolean,output,zb_join_status,user
boolean,output,zb_network_up,user
string,input,zb_bind_cmd,user
string,output,zb_bind_result,user
string,output,version,user
Click the new version property, check Host SW Version, and click OK.
Sensor Node template
| Visibility: | oem |
| Name: | ZB GW Sensor |
| Description: | Sensor Node |
| Registration: | None |
| Model: | linuxevb |
| Template Key: | iaszone |
| Version: | 1.0 |
| Type: | Node |
After creating the template, copy & paste the following properties into a text file, and import the file.
base_type,direction,name,scope
string,output,alias,user
string,output,long_address,user
string,output,model_id,user
integer,output,power_level,user
string,output,power_source,user
string,output,short_address,user
boolean,output,status,user
Light Node template
| Visibility: | oem |
| Name: | ZB GW Light |
| Description: | Light Node |
| Registration: | None |
| Model: | linuxevb |
| Template Key: | light |
| Version: | 1.0 |
| Type: | Node |
After creating the template, copy & paste the following properties into a text file, and import the file.
base_type,direction,name,scope
string,output,alias,user
string,output,long_address,user
string,output,model_id,user
boolean,input,onoff,user
integer,output,power_level,user
string,output,power_source,user
string,output,short_address,user
Dimm Node template
| Visibility: | oem |
| Name: | ZB GW Dimm Light |
| Description: | Dimm Light Node |
| Registration: | None |
| Model: | linuxevb |
| Template Key: | dimm |
| Version: | 1.0 |
| Type: | Node |
After creating the template, copy & paste the following properties into a text file, and import the file.
base_type,direction,name,scope
string,output,alias,user
integer,input,level_control,user
string,output,long_address,user
string,output,model_id,user
boolean,input,onoff,user
integer,output,power_level,user
string,output,power_source,user
string,output,short_address,user
Plug Node template
| Visibility: | oem |
| Name: | ZB GW Plug |
| Description: | Plug Node |
| Registration: | None |
| Model: | linuxevb |
| Template Key: | plug |
| Version: | 1.0 |
| Type: | Node |
After creating the template, copy & paste the following properties into a text file, and import the file.
base_type,direction,name,scope
string,output,alias,user
string,output,long_address,user
string,output,model_id,user
boolean,input,onoff,user
integer,output,power_level,user
string,output,power_source,user
string,output,short_address,user
Install the Ayla Zigbee Gateway
- Create a dummy
devd.conffile required byayla_install.sh:
$ touch devd.conf
- View installation options:
$ ./ayla_install.sh -h
- Start the installation. Wireless is the default mode. Wireless requires the -z flag.
$ sudo ./ayla_install.sh -z -e -a zb_gatewayd
- Include
-zto install BLE support. - Include
-eto install ZB support. - Include
-nto specify Ethernet (not Wi-Fi). - Include
-uto install over a previous installation.
- When the installation completes, do NOT reboot yet.
- Complete Configure your device in Ayla Linux Device Solution.
- Complete Connect & Register in Ayla Linux Device Solution.
Add Zigbee nodes
This section shows you how to add your devices as nodes to your Zigbee gateway. You will need to know how to put your devices into pairing mode. Below are some examples. Don't actually put your devices into pairing mode yet.
- For SmartThings Motion Sensors and Multipurpose Sensors, remove the cap, and hold down the small white button for about 5 seconds until the LED next to it blinks.
- For SmartThings SmartPower Outlet, hold down the connect button on the top of the unit for about 5 seconds until the led blinks.
- For GE Link Connected LED bulbs, if it is new, simply install it in a socket, and turn it on. If it has already paired with another device, reset it.
To add your devices to your Zigbee gateway, follow these directions:
-
Browse to the Ayla Developer Portal.
-
Click View My Devices.
-
Click the serial number of your gateway.
-
Click the Current Value column of the
zb_join_enableproperty.
-
Enter an integer representing the number of seconds the gateway will remain in pairing mode, and click OK. Common choices are 60, 90, and 120.
-
Put your Zigbee device into pairing mode.
-
Note that the
num_nodesproperty value increments:
-
Click the Candidates tab to verify that your device appears as a candidate:

-
Click
Register. -
Click the Nodes tab to verify that your device appears as a node:

-
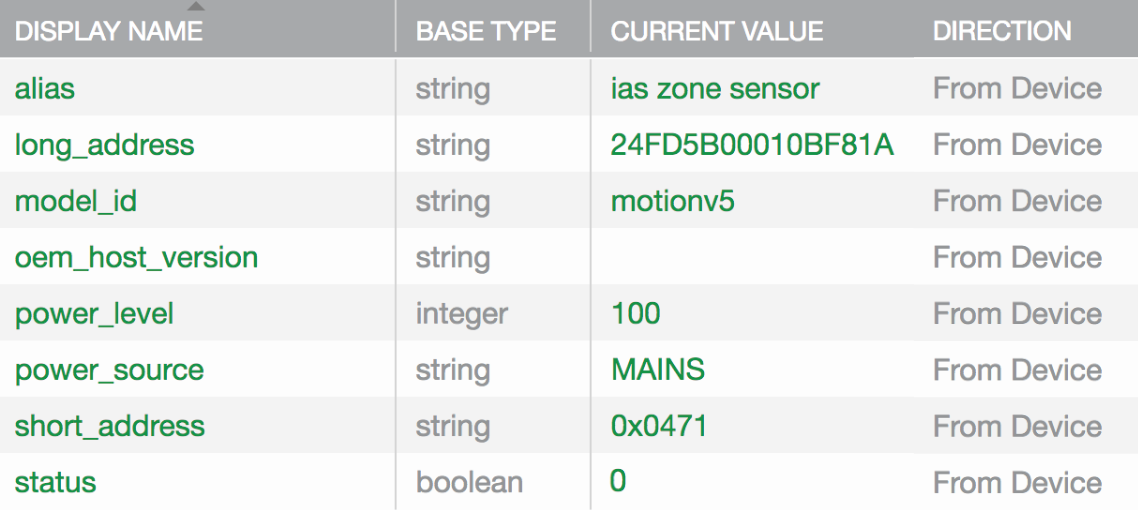
Click the serial number of your new node to inspect properties and details:
-
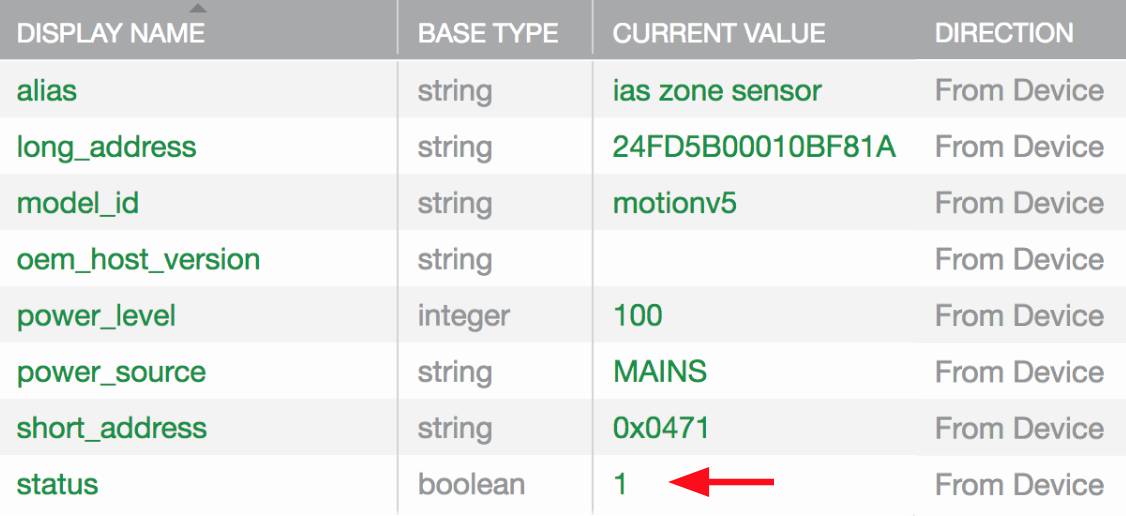
Interact with the device to cause property value changes. For example, create motion near a motion detector, and note that the
statusproperty value changes to1:
Updated about 1 year ago