Users
This section of the Users and Roles guide describes the following:
- The three types of users in the Ayla Platform, including where their accounts are created and located and any important aspects about the user accounts.
- The options available to manage and configure features for the users.
OEM Users
The OEM User has the most authority to access, control, customize, and configure features in the Ayla Platform, including managing the deployment of Ayla-connected devices. OEM users are typically:
- Administrators in Ayla’s OEM customer’s organization.
- Support Managers to manage the fleet of devices.
- Developers to build/test devices.
OEM users can also hold the highest level of permissions in the platform, which is the OEM Admin role (described in the Roles section of this guide). With the OEM Admin role, the OEM user may be responsible for assigning roles to all of the company’s users per company policies. We refer to these OEM Users as OEM Admins. The OEM Admin has a bird’s eye view and control over all OEM devices and users in the platform.
OEM User Accounts in the Ayla Platform
OEM user accounts are mainly created in the Ayla Customer Dashboard. Only OEM users with the OEM Admin role can add other OEM user accounts. The dashboard provides OEM Admins with crucial data visibility and control over how other users manage and configure devices.
The OEM Admin creates OEM user accounts from the OEM Users page, as shown in the example below.

Notice that the above example shows the UUIDs (Universally Unique Identifiers) instead of any personal information because the General Data Protection Regulation (GDPR) option is enabled.
OEM users can be assigned multiple roles/privileges in the platform. Refer to the Roles section for more information on assigning roles. As shown in the example above, all roles assigned to the OEM user are displayed on the main OEM Users page as a quick reference.
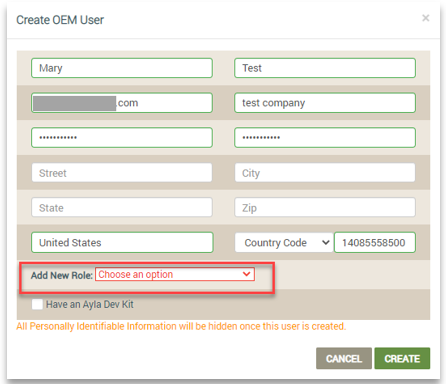
When creating an OEM user account in the dashboard, the OEM Admin must assign at least one role, as shown in the example below.
Another way OEM Admins can add OEM Users to the platform is to change an existing End User account into an OEM user account. This is done in the End User account by assigning an OEM role (e.g., OEM::Developer), as shown in the example below.
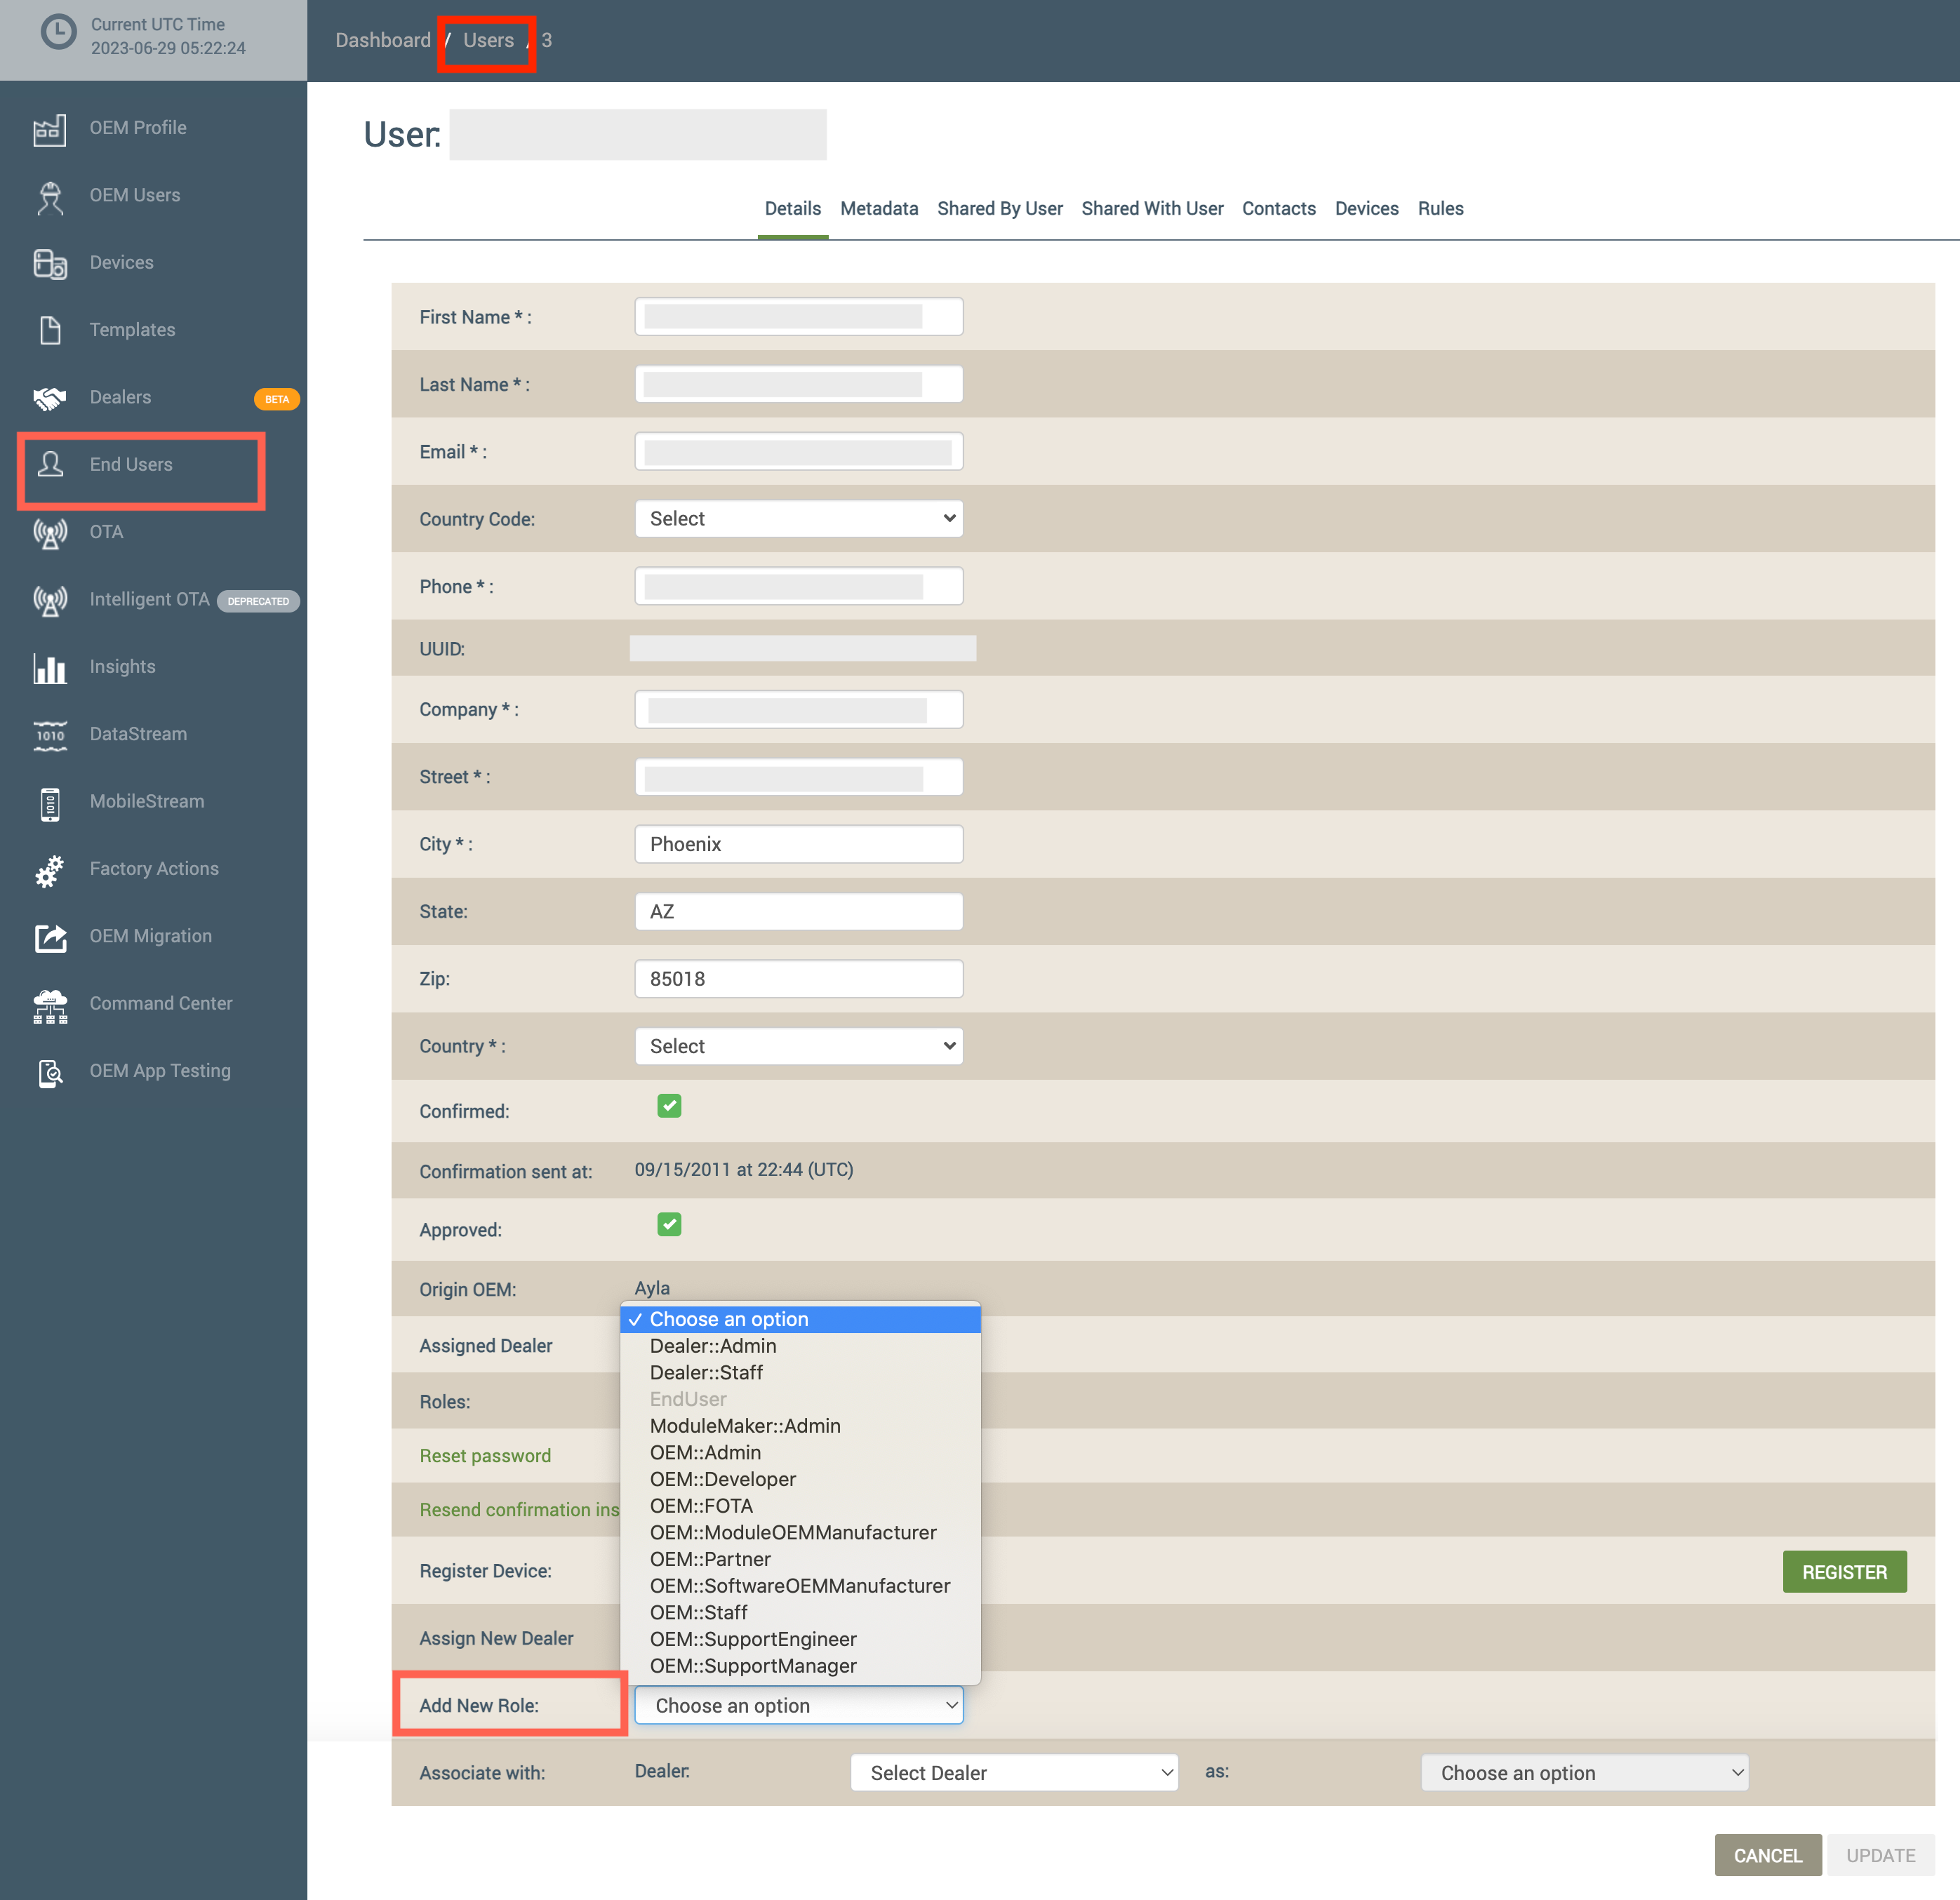
After assigning the OEM role to the end user, the user's account is added to the OEM Users area of the dashboard, and this user no longer has an End User account.
Confirmation and Approval of the OEM User
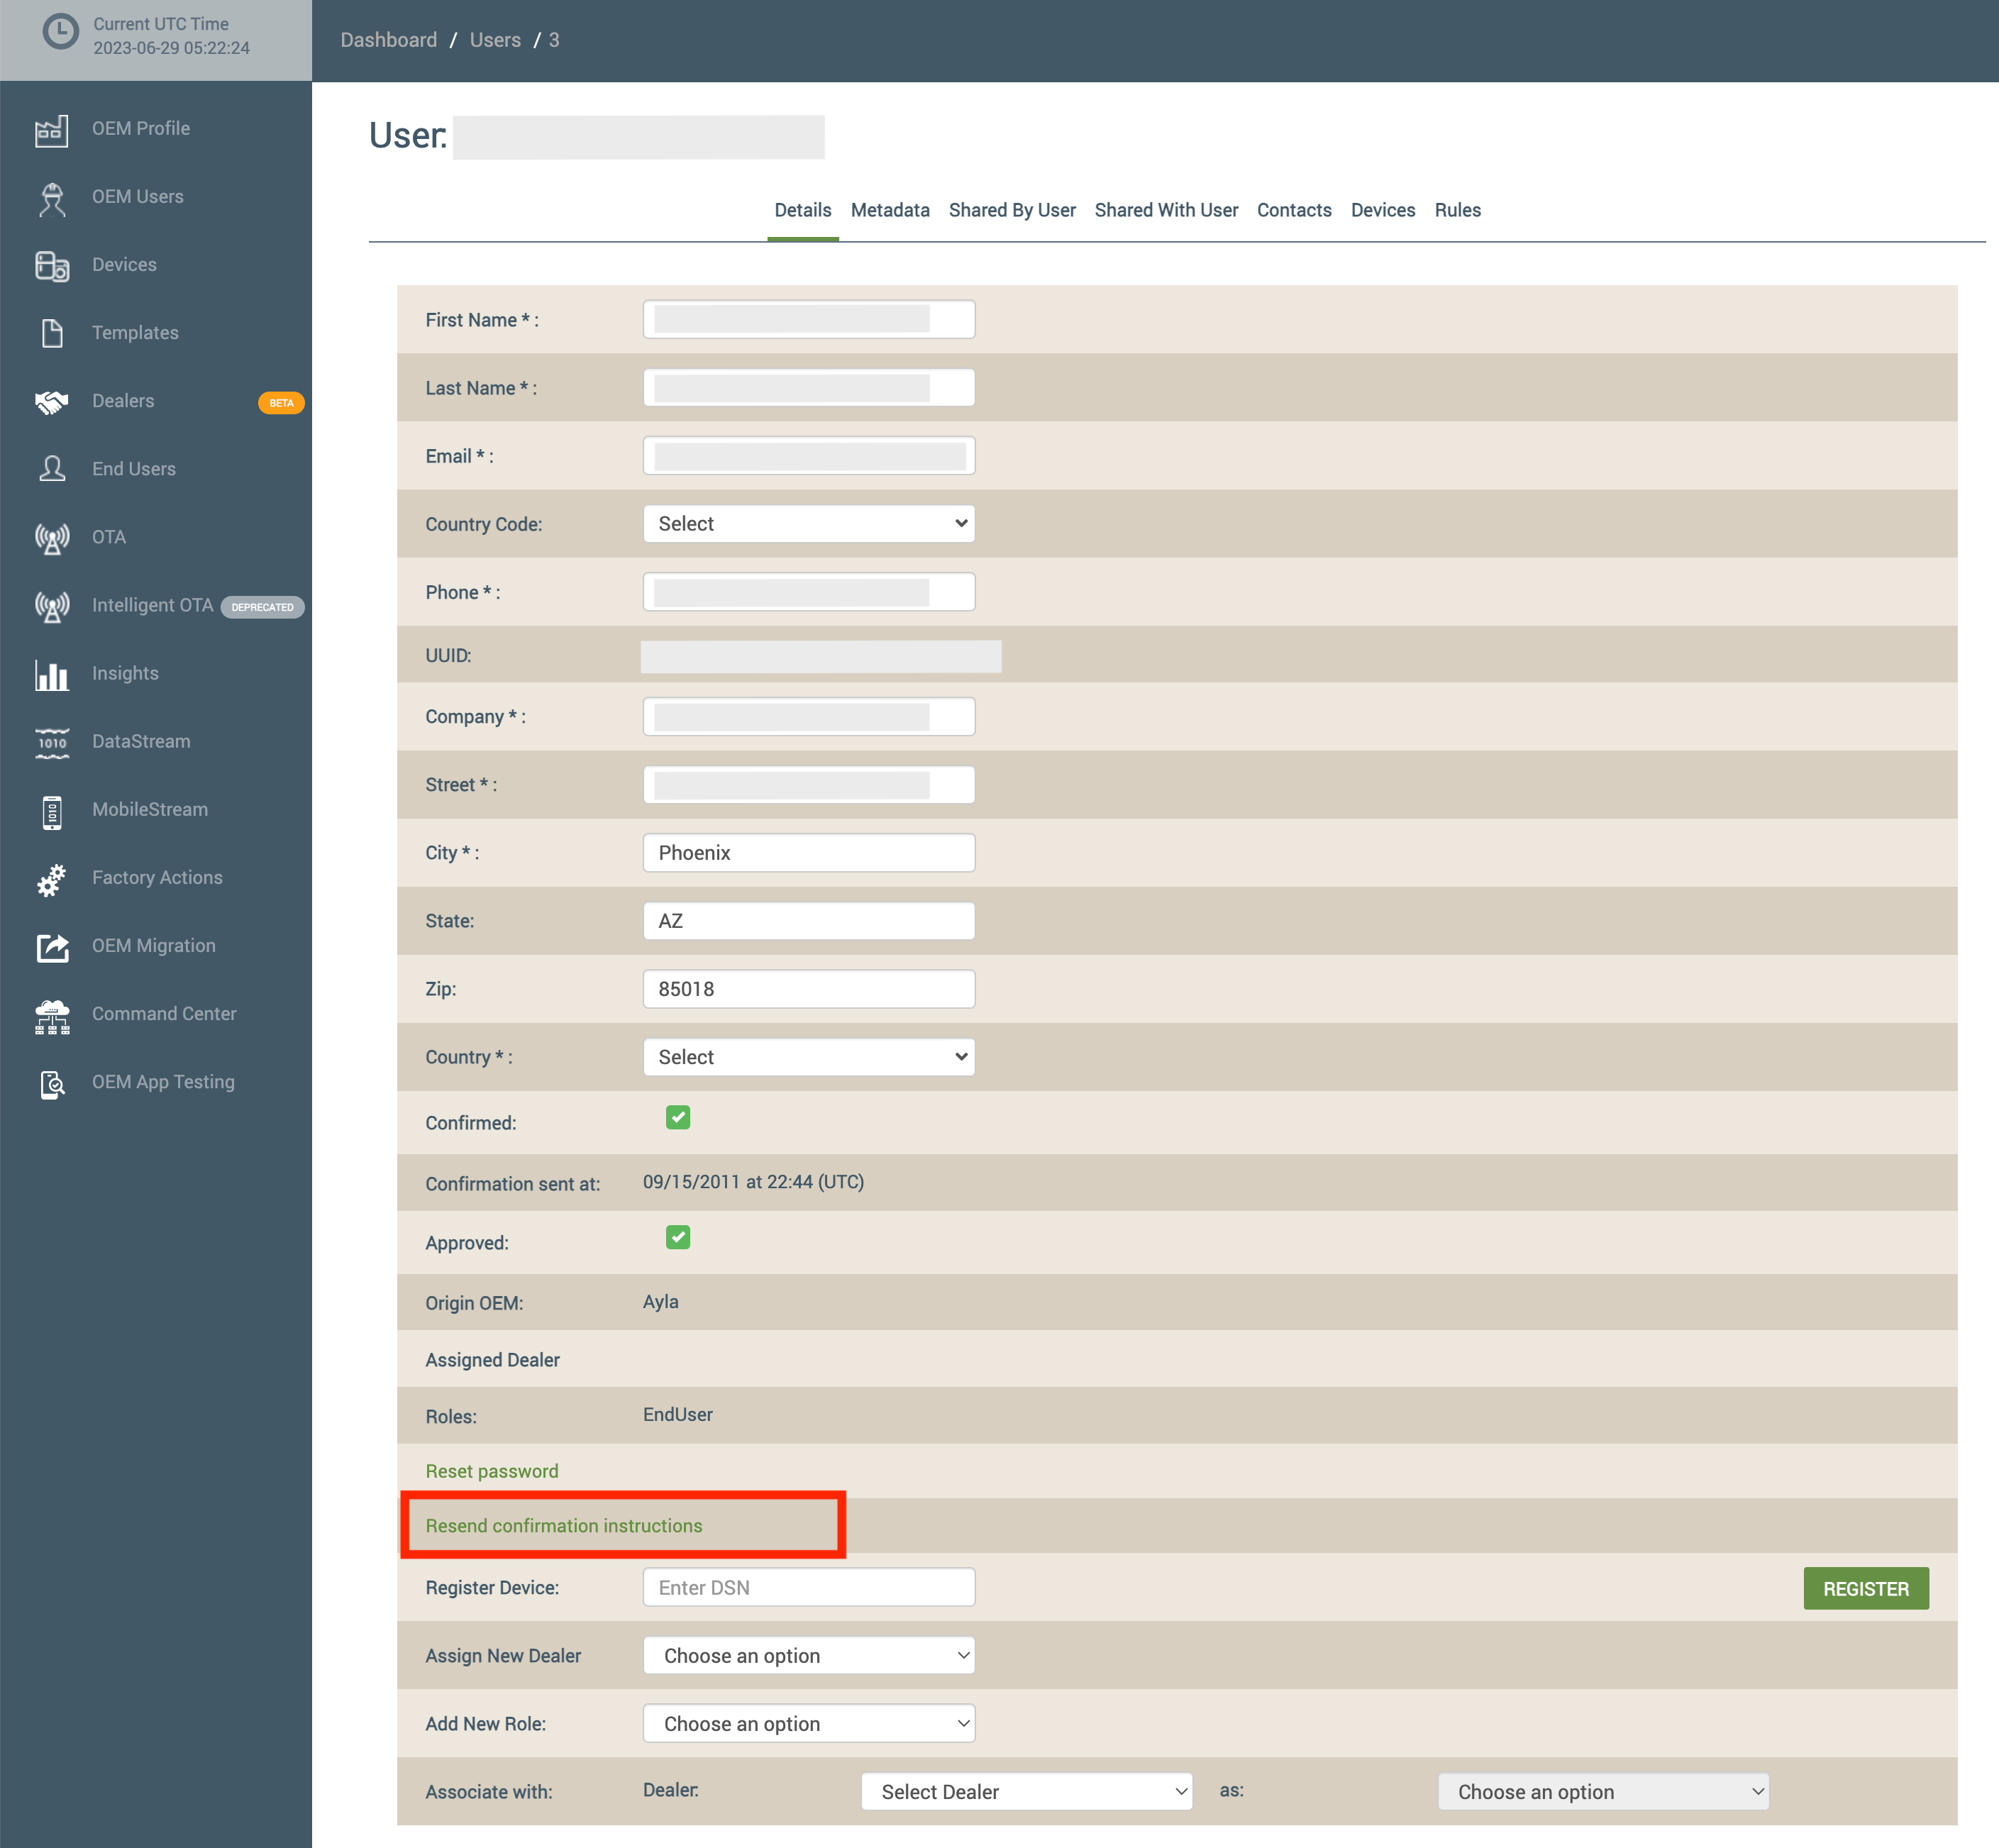
When the OEM User account is added to the dashboard, the OEM user receives an email with a confirmation link to confirm the account. OEM User accounts must be confirmed and approved before the OEM user can get started in the Ayla Platform. If the OEM user cannot find the confirmation email, the account details provides a link to have another confirmation email sent, as shown in the example below. The OEM Admin or user accesses the account details from the OEM Users page to resend this confirmation.

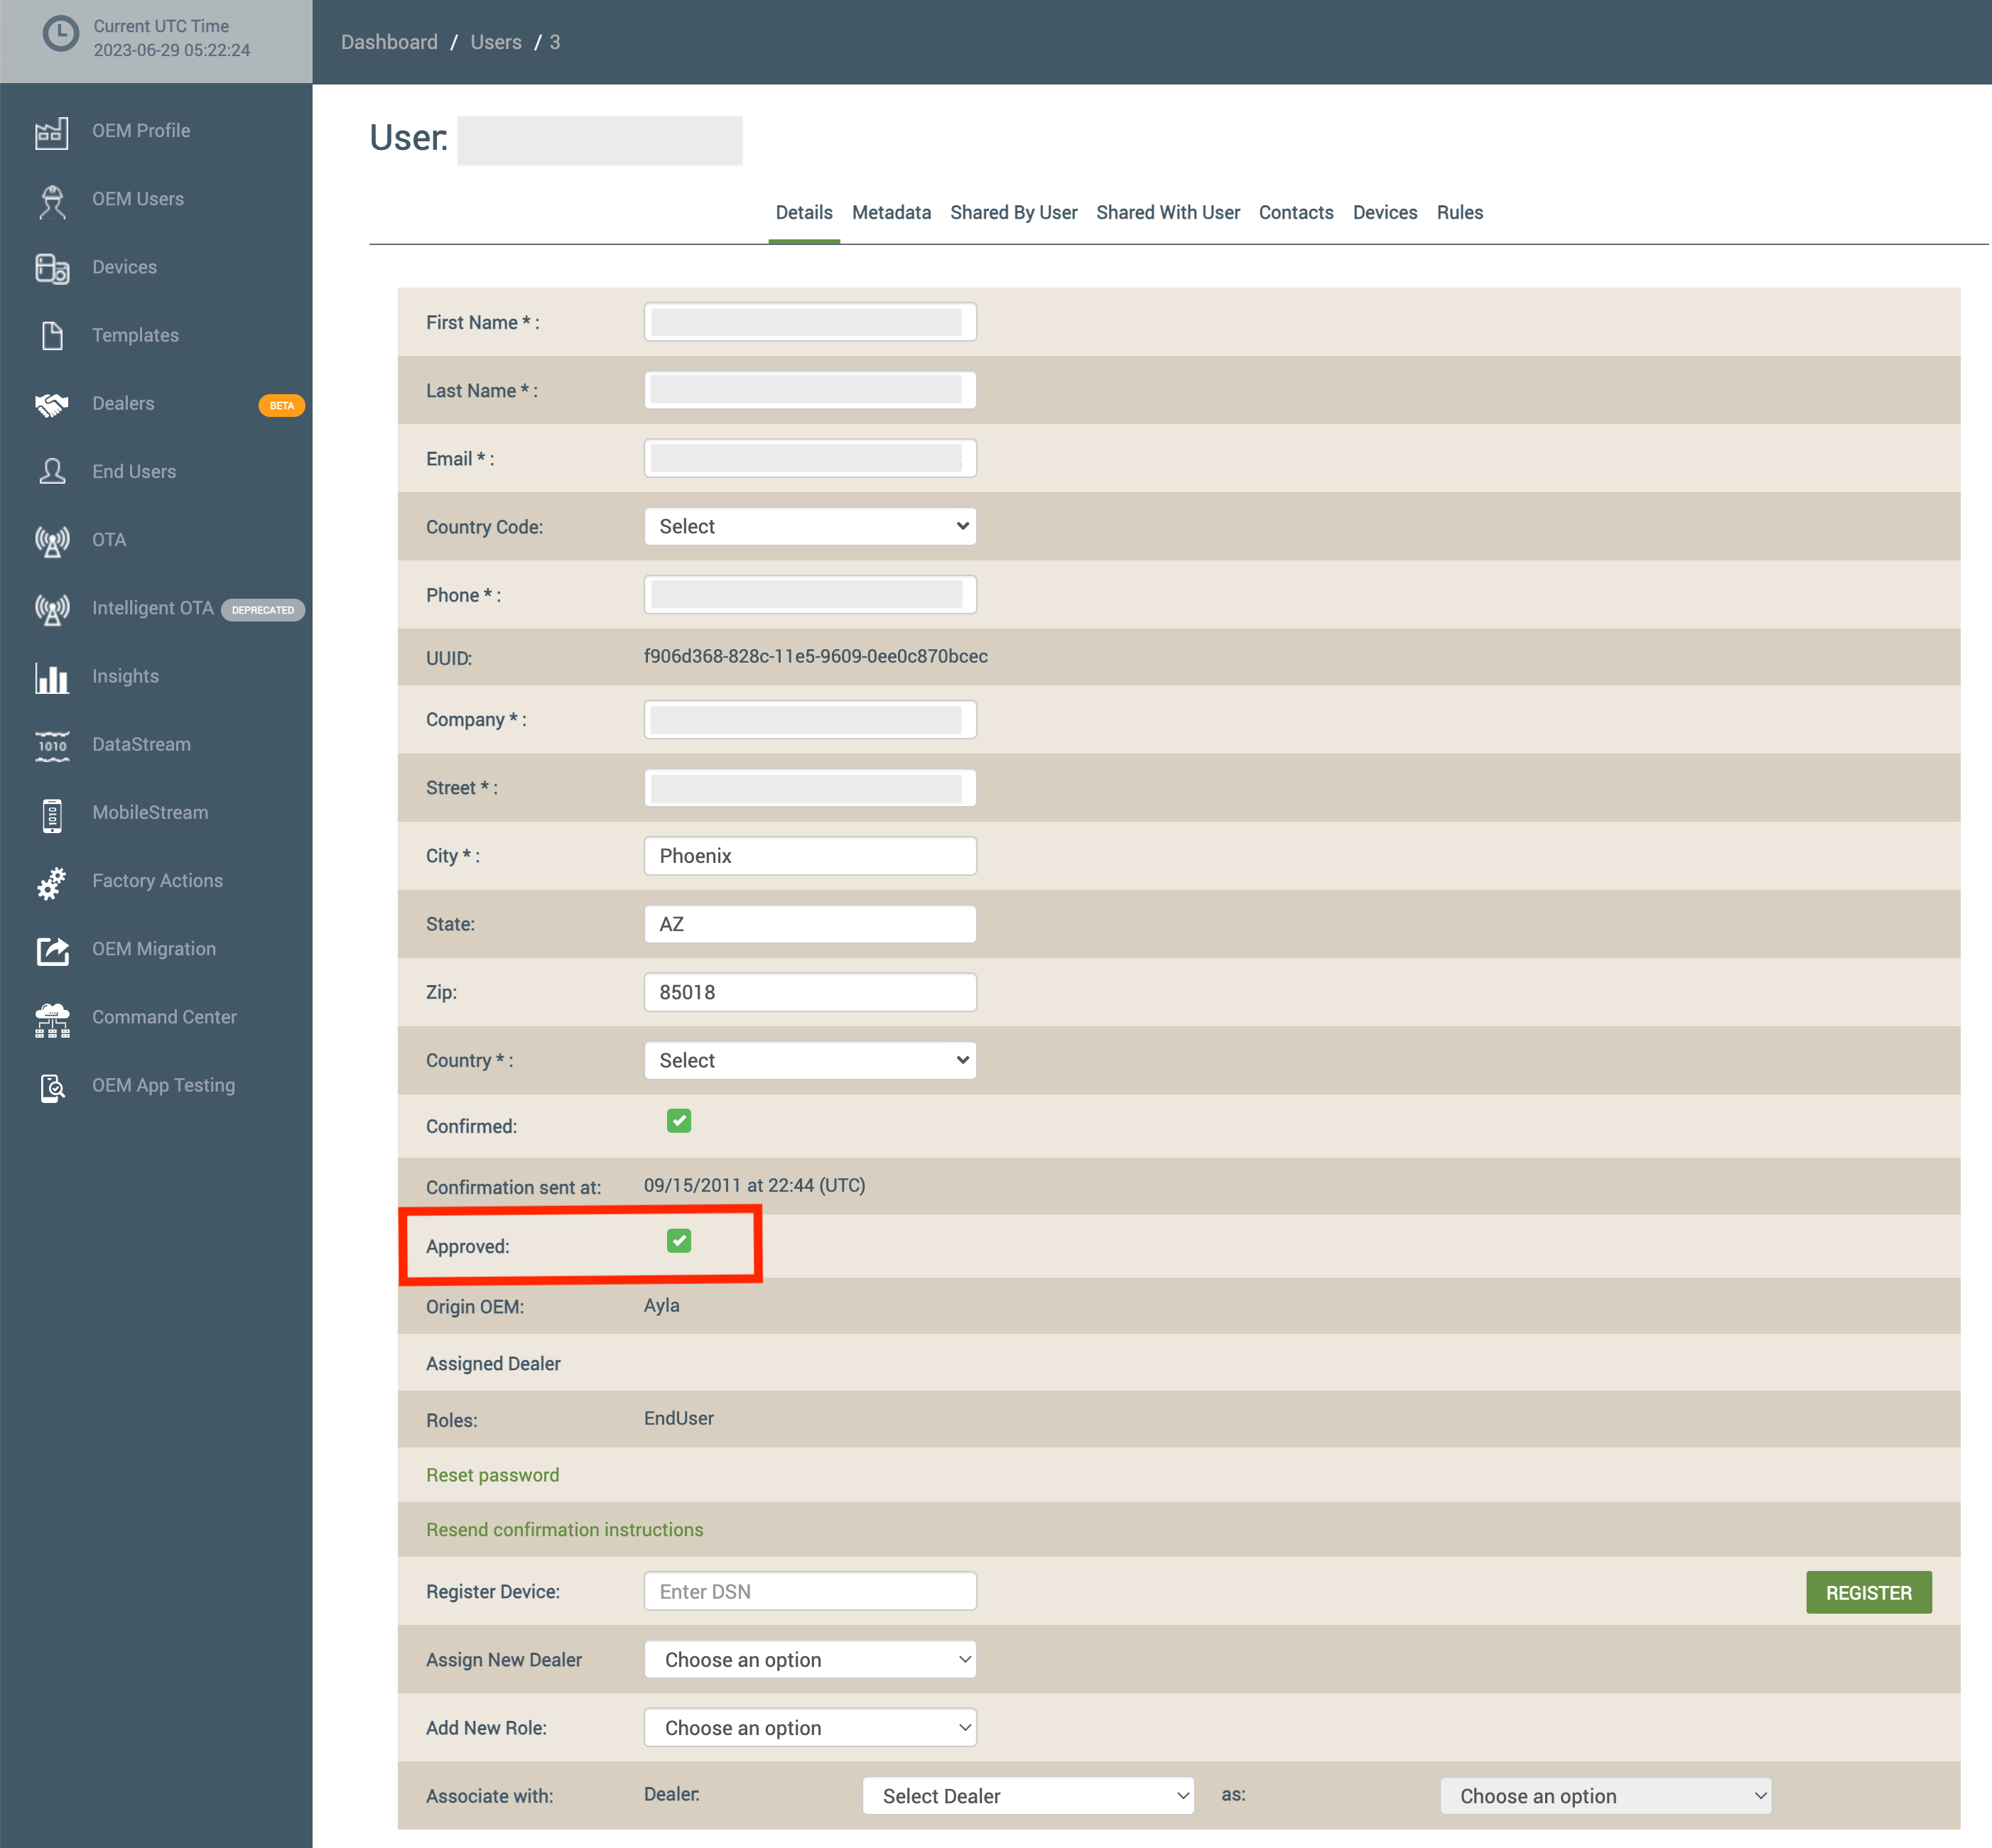
When the OEM user confirms the account via the confirmation email, the account is also approved in the platform. If it is not approved, the OEM Admin can do this by selecting the Approved checkbox in the user's account details (as shown below).

When the OEM user’s account is confirmed and approved and has at least one assigned role (permissions), the user can access features and perform actions in the Ayla Platform (Ayla Customer Dashboard, Ayla Developer Portal, RESTful API, etc.) based on the privileges for the assigned role(s).
End Users
In the Ayla platform, end users are either:
- Consumers who bought Ayla’s OEM customers’ devices directly from the OEM or from a Dealer company.
- Employees of the OEM or the Dealer company (called Dealer Users).
End User Accounts in the Ayla Platform
End users are created in the Ayla Customer Dashboard (as shown in the example below). Everyone who signs up/registers for an account in the Ayla Platform is provided with an End User account that can be found in the End Users area of the dashboard. Additionally, OEM users with the OEM Admin role can create end user accounts for employees in their OEM organization, the OEM's customers, the employees at the OEM's Dealer companies, and the Dealer company’s customers.

Confirmation and Approval of the End User
When the End User account is added to the dashboard, a confirmation email is sent to the end user. End User accounts must be confirmed and approved before the end user can get started in the Ayla Platform. If the end user cannot find the confirmation email, there is an option in the end user's account details to resend the email. Refer to the following example:
When the end user confirms the account via the confirmation email, the account is also approved in the platform. If it is not approved, the OEM Admin can do this by selecting the Approved checkbox in the user's account details (as shown below).
When the end user’s account is confirmed and approved and has at least one assigned role (permissions), the user can access features and perform actions in the Ayla Platform (Ayla Customer Dashboard, Ayla Developer Portal, RESTful API, etc.) based on the privileges for the user's assigned role(s).
End User Account Management
End user account management feature provides user-friendly and secure account management workflows, ensuring that both users and OEMs can effectively manage account access and recovery.
Account login attempts and lockout duration
By default, the account allows a maximum of 5 login attempts, after which it will be locked for 15 minutes (Default time). The OEM Admin can configure the account lockout period, with 10 minutes being the minimum time. This configured duration applies to all users under the OEM.
If incorrect credentials are entered, the number of wrong password attempts and the number of remaining attempts are shown to assist users.
If users enter the correct password within their 5 permitted attempts, the permitted attempts are reset to 5 again. Whenever users successfully reset their password using the 'Forgot Password' option, the permitted attempts are reset to 5 again.
Password Reset Process
After the lockout period, users can use the correct credentials to log back in again into their accounts. In case users want to reset their password, there are following two options to do it:
-
Users can reset their password using the Forgot Password option.
-
OEMs can initiate reset password process for an end user using the Ayla Customer Dashboard.

End User - Rules
Using the Rules tab in the User page, you can view Rules, Actions, or Destinations associated with a specific end user. The following image shows Rules tab for an end user:

Dealer Users
Dealer users are direct staff or contract employees of a Dealer company. Dealer companies (called Dealers) are clients of Ayla’s OEM customers. Dealers are the OEM’s customers who sell the OEM's devices to end users. Ayla’s OEM customers can use the Ayla Customer Dashboard to create and manage accounts for Dealers, the Dealer’s employees (Dealer users), and the Dealer’s end users. This saves OEMs the additional costs and lead time involved in building their own user interface to manage these types of users and their registered devices.
Before you can add Dealer users, you need to have or create an account for the Dealer company. This is done in the Dealers area of the Ayla Customer Dashboard, as shown in the example below. To create a Dealer account, OEM users must have OEM::Admin and OEM::Staff privileges in the dashboard (as discussed in the Roles section of this guide).

You also need OEM::Admin or OEM::Staff privileges to create a new Dealer user in the dashboard.
There are two ways to create Dealer users. From the Dealer's page, you open the account for the dealer company (refer to the above example), and then click the Dealer Users tab (shown below) to add a new Dealer user for that dealer company.

Or, if there is an End User account already in the dashboard that should be assigned to the dealer company, you search for the end user on the End Users page and then open the end user's account details. Refer to the following example:

In the account details, you can create a Dealer user by configuring the Associate with: field. You have to select the dealer company in the Dealer:drop-down list and then a role (permissions) for the new Dealer user in the as: drop-down list. Refer to the following example:

In the example above, the Dealer drop-down list shows the dealer companies with accounts in the dashboard. When you complete this configuration, the Dealer users are added to the Dealer Users tab in the Dealer’s account, as shown below:

User Options & Management
You can view and manage the OEM user’s, end user’s, and Dealer user’s accounts from the Ayla Customer Dashboard. Most of the information you can view, edit, and configure is similar for all three types of users. For this reason, their user accounts have an identical design in the dashboard to make managing your user details and configurations easy and efficient. Refer to the following examples showing the similarity among all three:


This section describes the options available to configure and manage the user accounts.
GDPR Compliance for Users
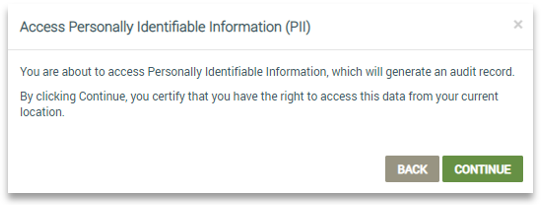
GDPR is Ayla’s privacy feature for customers in the European Union (EU) to comply with the EU General Data Protection Regulation (GDPR). This feature affects all three types of users. When enabled, the Ayla platform no longer shows any Personally Identifiable Information (PII) on users, and the logged-in user is not able to view any PII throughout the platform without agreeing to the terms specified in the PII notifications. Following is an example of these notifications:
Customers in any region (except China) can contact Ayla Technical Support to have the GDPR feature enabled.
This feature is configured in the Ayla Customer Dashboard (shown below):

Changing User Details
You can edit basic information about users (i.e., contact information) on the Details tab of their accounts, as well as make other configurations. For example, from the Details tab for both OEM and end users, you can register devices. On the Details tab for the end user, you can also assign a Dealer company to a user account or associate the user with a Dealer company (thereby creating a Dealer user). All these configurations are covered in this section on User Options and Management.
The Details tab for all user accounts is also used to assign, change, and delete roles (permissions). (For more information, refer to the Roles section of this guide.)
Accessing the Details tab is the same for OEM and end users. You navigate to the OEM Users or End Users page, and then find and click the user’s account. Refer to the following example of the Details tab:

The Details tab for Dealer users is different from the OEM and end user’s. You cannot register devices, and you can only change the Dealer company assigned. Since the Dealer user account is based on the dealer company, you must first open the Dealer’s account and navigate to the Dealer Users tab. On this tab, you click the Dealer user to open the Details tab (shown below).

Registering Devices for Users
You can register devices from the user’s account in the Ayla Customer Dashboard or by using the Ayla Developer Portal. Either way, all devices registered to the user are kept with the user’s account information in the dashboard.
Registering Devices for OEM and End Users in the Dashboard
In the dashboard, you can register devices from the Details tab of the user’s account, as shown below. On the OEM Users or End Users page, you search for and click the user account to open the Details tab. You do not have to be in the edit mode to register a device.

After registering the devices for the OEM or end user, the devices are added to the Devices tab in the user’s account, as shown below:

From the Devices tab in the user’s account, you can also easily review, change, and configure settings for the user’s devices. To do this, you click the device in the table listing on the Devices tab (shown above) to open the Devices page (shown below):

If the end user is a customer of a Dealer company, the registered devices are also added to Assigned Devices tab in that Dealer’s account (shown below). To view the registered devices from this tab, you navigate to the Dealers area of the dashboard, search for and click the Dealer in the table listing, and then click the Assigned Devices tab.

On the Assigned Devices tab, you can also unassign an end user’s device from the Dealer’s account by clicking the “X” under Actions, as shown below. This removes the device from the Assigned Devices tab; a message should appear at the top of the page when the device is successfully removed (also shown in the example below).

Registering Devices for Dealer Users in the Dashboard
For Dealer users, you register devices using the Details tab from the End Users page, not the Dealers area of the dashboard. To do this, you search for the Dealer user on the End Users page, click the user in the table listing to open the Details tab, and then register device as described above for OEM and end users. The registered devices are added to the Devices tab for the Dealer user in the Dealer’s area, as shown below:

Registering Devices Using the Developer Portal
Advanced developers can register devices using the Ayla Developer Portal. All other users should register devices using the Ayla Customer Dashboard or the Ayla Aura mobile app.
For developers who wish to register their devices using the Developer Portal, you need to have an Ayla Developers account. Refer to the Ayla Developer Portal User’s Guide for the steps to create an account. Once you have an account and are logged in to the portal, click the Register New Device tab (shown in the example below) to get started. The steps to register a device using the Developer Portal are also in the user’s guide.

When you register the device in the Developer Portal, the device is also listed on the Devices tab in the user’s account on the Ayla Customer Dashboard, as shown below:

Associating Users with Dealers
Dealers are companies that purchase OEM devices from Ayla’s OEM customers, and then sell the OEM's devices to end users. There are two types of users associated with Dealers:
- Dealer users who are direct or contract employees of the Dealer company.
- Customers who purchased the OEM’s devices from the Dealer company (who are referred to as end users in the Ayla Platform).
In the Ayla Customer Dashboard, you can assign end user accounts to Dealers and associate OEM and end users with Dealers, and then unassign or change these configurations. To do any of this, the Dealer company must have an account in the dashboard. You can find and create accounts for Dealer companies on the Dealers page in the dashboard. Refer to the following example:

Assigning/Associating Users with Dealers
On the Details tab in the user’s account, you can link the user’s account to a Dealer company as follows:
- For OEM or end users who are Dealer users, in the Associate with: field, you select the Dealer company (employer) in the Dealer: drop-down list and then a role (permissions) for the Dealer user in the drop-down list next to as: (shown in the example below).
- For end users who purchased OEM devices from the Dealer company, you select the name of the Dealer in the Assign New Dealer field (shown in the example below). Note that this field is only available on the Details tab for end users (which is the example below), not OEM users or Dealer users.

After making these configurations, end users who are customers of the Dealer company are added to the Assigned End Users tab for the Dealer’s account in the dashboard, as shown below:

Dealer users are added to the Dealer Users tab in the Dealer’s account, as shown below:

Unassigning End Users from Dealers
You can unassign an End User account from the Dealer company by clicking the “X” under Actions on the Assigned End User tab, as shown below. This removes the end user from the Assigned End User tab; a message should appear at the top of the page when the end user is successfully removed (also shown in the example below).

Changing the Assigned Dealer for an End User
In the Dealers area of the dashboard, you can easily change the settings for an end user listed on the Assigned End User tab. As shown below, you click the end user in the table listing (shown below) of this tab to open the end user’s account details.

In the end user’s account, you click EDIT to make changes to the Assigned Dealer setting.

Metadata in the User Accounts
In addition to entering the basic information (full name, email, etc.) when adding OEM or end users, you can add metadata using the Cloud APIs in User Service; click here for more information. Metadata is used to tag the user with different types of information to give you more context about the user (i.e., location or a color to group particular users).
Once the metadata is added, you can view and delete it in the Ayla Customer Dashboard, as shown below.

Sharing Devices Among Users
Device sharing is an important feature for different types of end users. For example, household devices can be shared among family members or their guests. There are also many examples of devices that require sharing in commercial settings; hotels, for example, have connected locks with access granted to multiple guests for specific time periods.
Ayla’s RESTful APIs include Share APIs that enable the user to share registered devices with other users. When configuring this, you can set a specific timeframe to share the device. Click here for the examples of the Share APIs.
From the user’s account in the Ayla Customer Dashboard, you can view a searchable list of devices being shared among users, along with the details of the shared configuration. This feature can, for example:
- Allow users to search for individual device’s usage statistics.
- Help troubleshoot issues.
Refer to the following example of the information on your shared devices that is provided in the Ayla Customer Dashboard. The same information is provided on both the Share With User tab and the Share By User tab.

Administrators or the OEM user who owns the resource (called the owner) typically create the share. By specifying a resource name (e.g. if you are sharing a device, the name of your device) and a unique resource identifier (e.g. the device serial number if the resource is a device), the CRUD (Create, Read, Update, Delete) APIs support sharing the resource. When a resource is shared by the owner, the resource for the target user contains updated grant information (read/write permissions). Following are conditions for shared devices:
- Currently, only devices or a collection of devices may be shared.
- Only the owner to whom the device has been registered may share a device, unless an administrator is creating a share between two registered users.
- A resource may be shared to one or more registered user.
- A user cannot have more than one share for the same resource name and resource ID.
- Share access controls access rights: A resource can be shared with read/write permissions or with a particular role. The access control for devices shared with a role depends on the access control of the role on the resource.
- Devices shared with LAN-Mode enabled, always have read/write access irrespective of the access control with which it is shared.
- Shares may include a start and end timestamp (as described above for the information provided in the Ayla Customer Dashboard on the share).
- Sharing supports custom email templates for share notifications on creation.
Adding Contacts to User Accounts
After creating accounts for the OEM user, end user, or Dealer user in the Ayla Customer Dashboard, you can add contacts for each type of user, which is kept with the user’s account information. In addition to the usual information (i.e., full name, email, phone, etc.), you can include and configure the following information for your contact:
- Metadata: to provide additional information about this contact that may be useful, such as other location details (i.e. region), position at the company, etc.
- OEM Models: option to select the model number of OEM host application board that is assigned to this contact for reference.
- Send SMS: option to send SMS notifications from you.
- Send Emails: option to send email notifications.
- SMS Acceptance: option to specify that your contact accept the SMS notification before being able to view it.
- Email Acceptance: option to specify that your contact accept the email notification before being able to view it.
- Notes: to reference any additional information on this contact.
Refer to the following example for an OEM user:

You can edit the contact’s information by clicking the contact listed to open the Edit Contact dialog box.